Before you start
Decide how you want to build your website
There are three ways to build your new Easol site, and choosing a path at the beginning ensures a smooth launch:
Option 1: Configure a free Easol theme
Configure and customise a free Easol theme with your images and branding, without coding. Just use our website builder to create and launch the site by yourself. No technical skills required.
Option 2: Modify the code of a free Easol theme
This approach uses Easol themes as a foundation and gives you some extra flexibility in how your site looks and functions. But you’ll need to know some HTML/CSS, or hire a developer to help you make modifications.
Option 3: Build a custom theme from scratch
Get the most freedom in terms of site design, while still using Easol’s great functionalities. If you have a grand vision and the budget for a designer and developer, you can build a custom site from the ground up.
Of course, there are no right or wrong approaches to building an Easol site. We’ve seen great results across the whole spectrum. It just depends on your own vision and resources.
Tip: Check out our Partners Directory. It’s a directory of Easol-approved experts in design, branding, development and more, to help you launch smoothly and leave a great impression on customers.

Gather all your brand assets and content
Whether you have an existing site on another platform or you’re launching from scratch, get started by organising all of your brand assets and content. It’s not the most exciting thing in the world, but we promise it’ll make the process of creating your site much easier.
We recommend having the following ready:
Launching your experience with Easol
1. Add brand styles
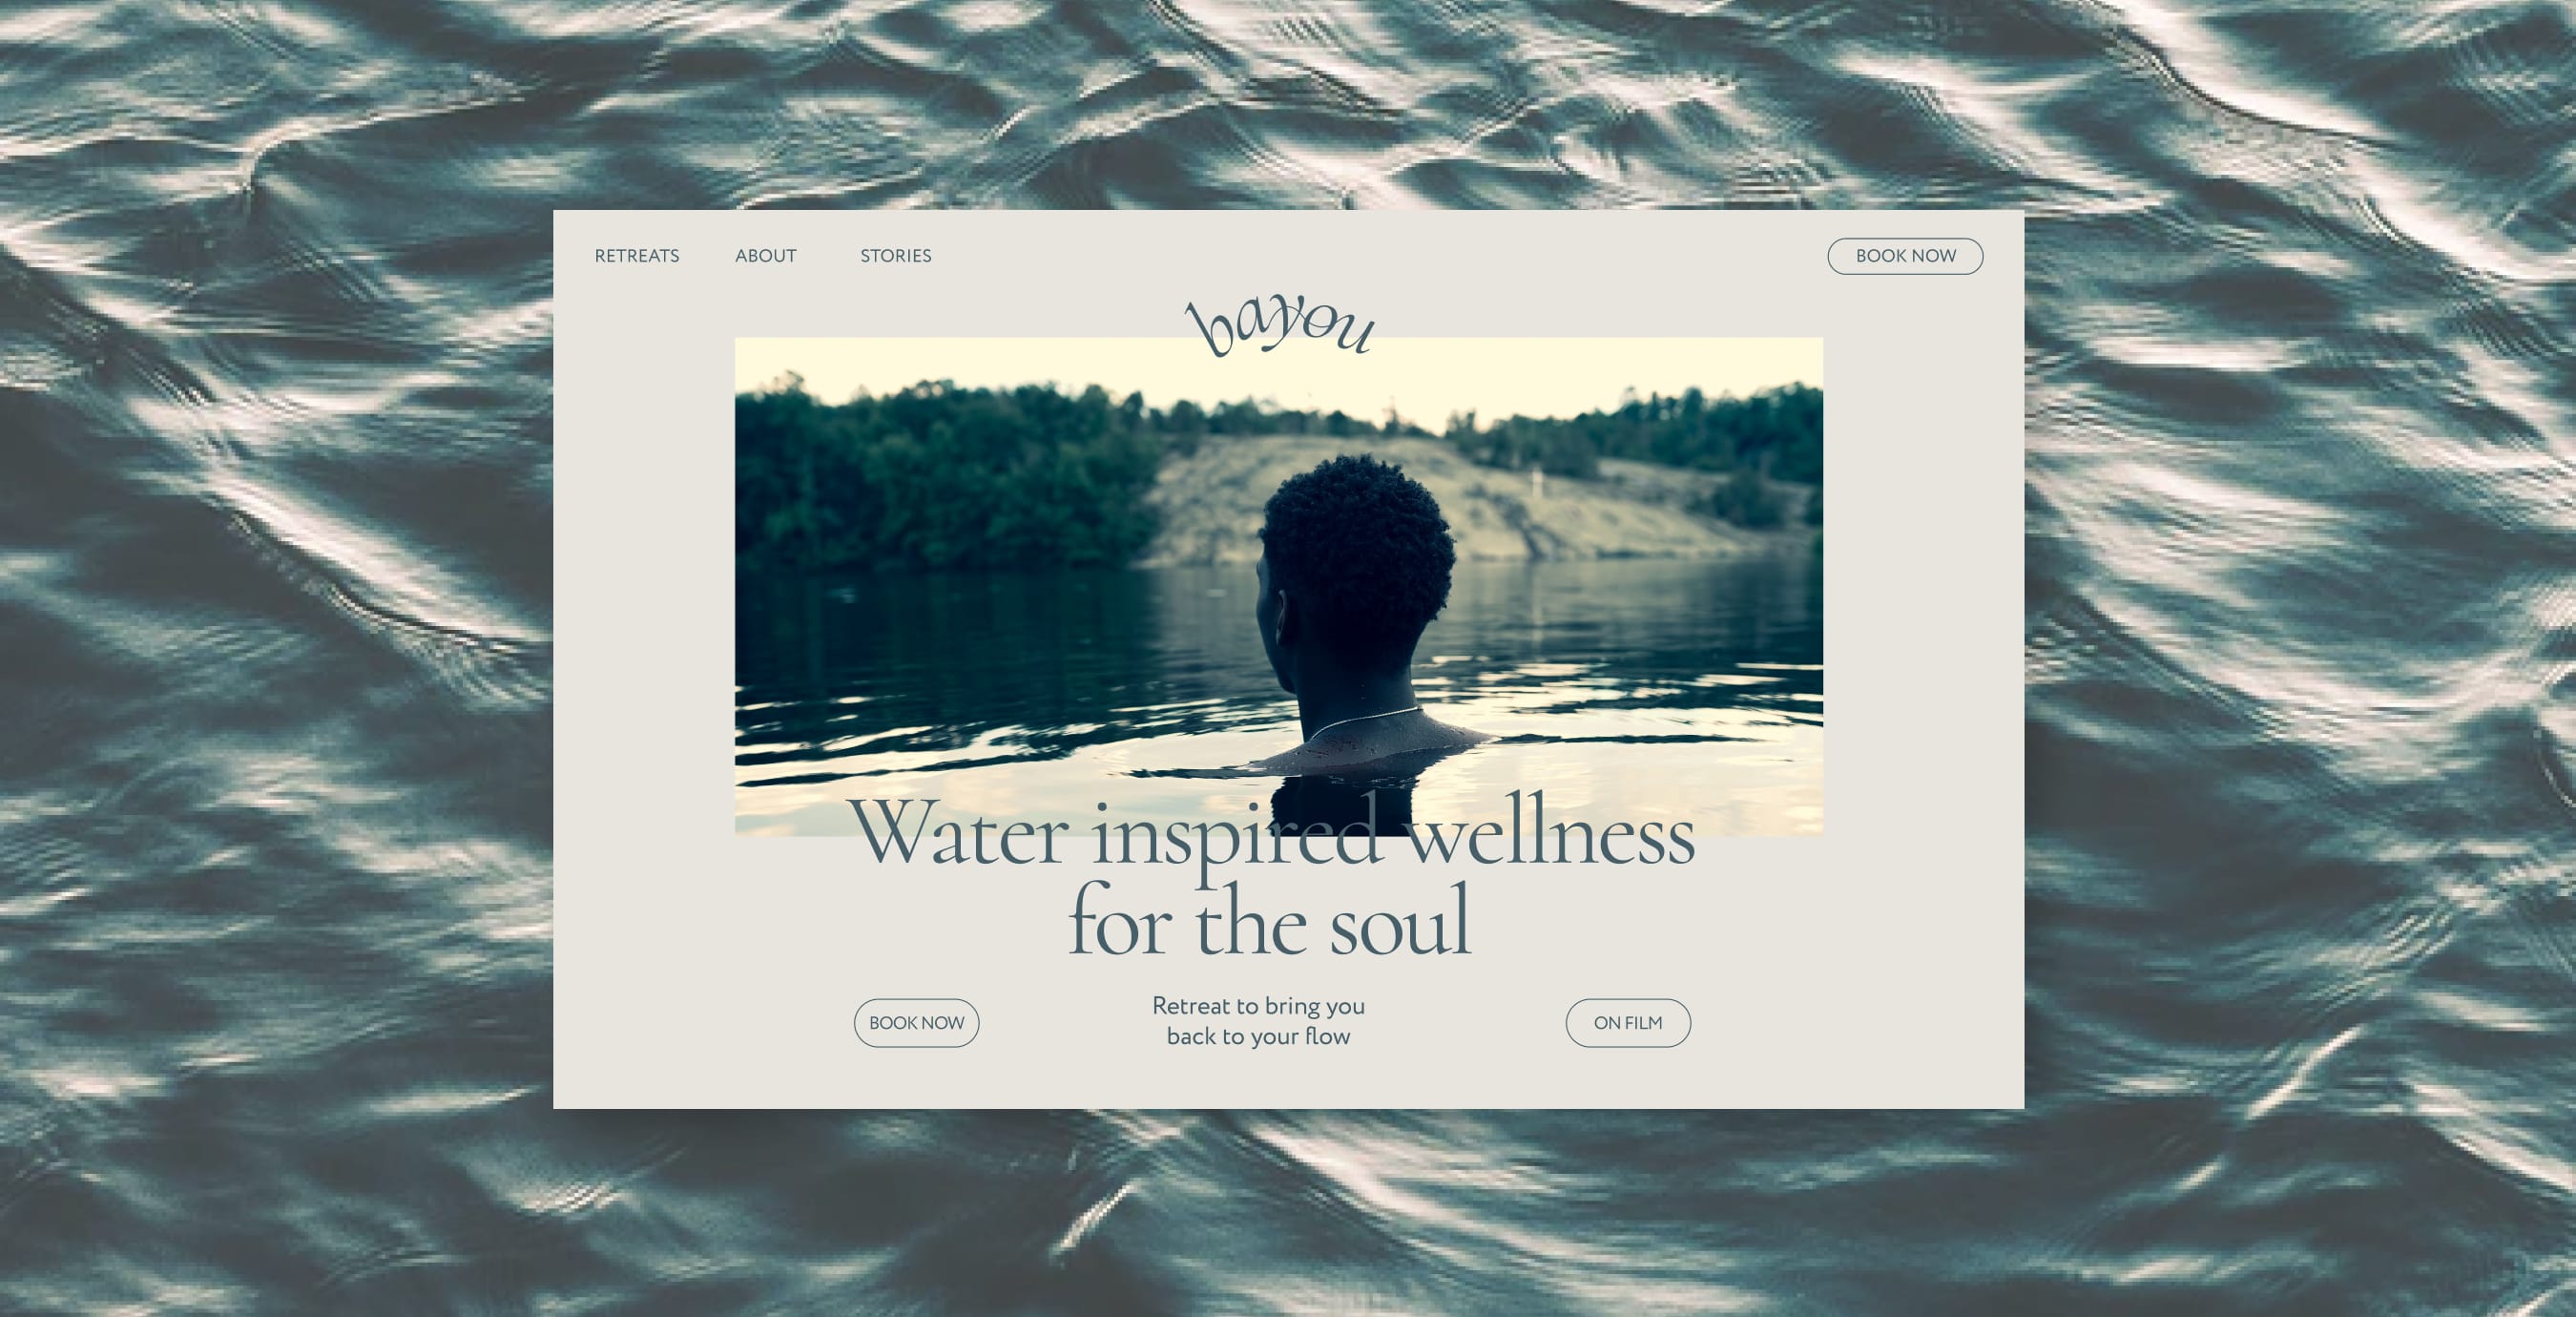
On Easol, your website is your brand's masterpiece. To get started, add the main elements of your branding, including:
Logo
The star of your brand. Upload a high-res PNG file of your logo to Settings > Your Brand.
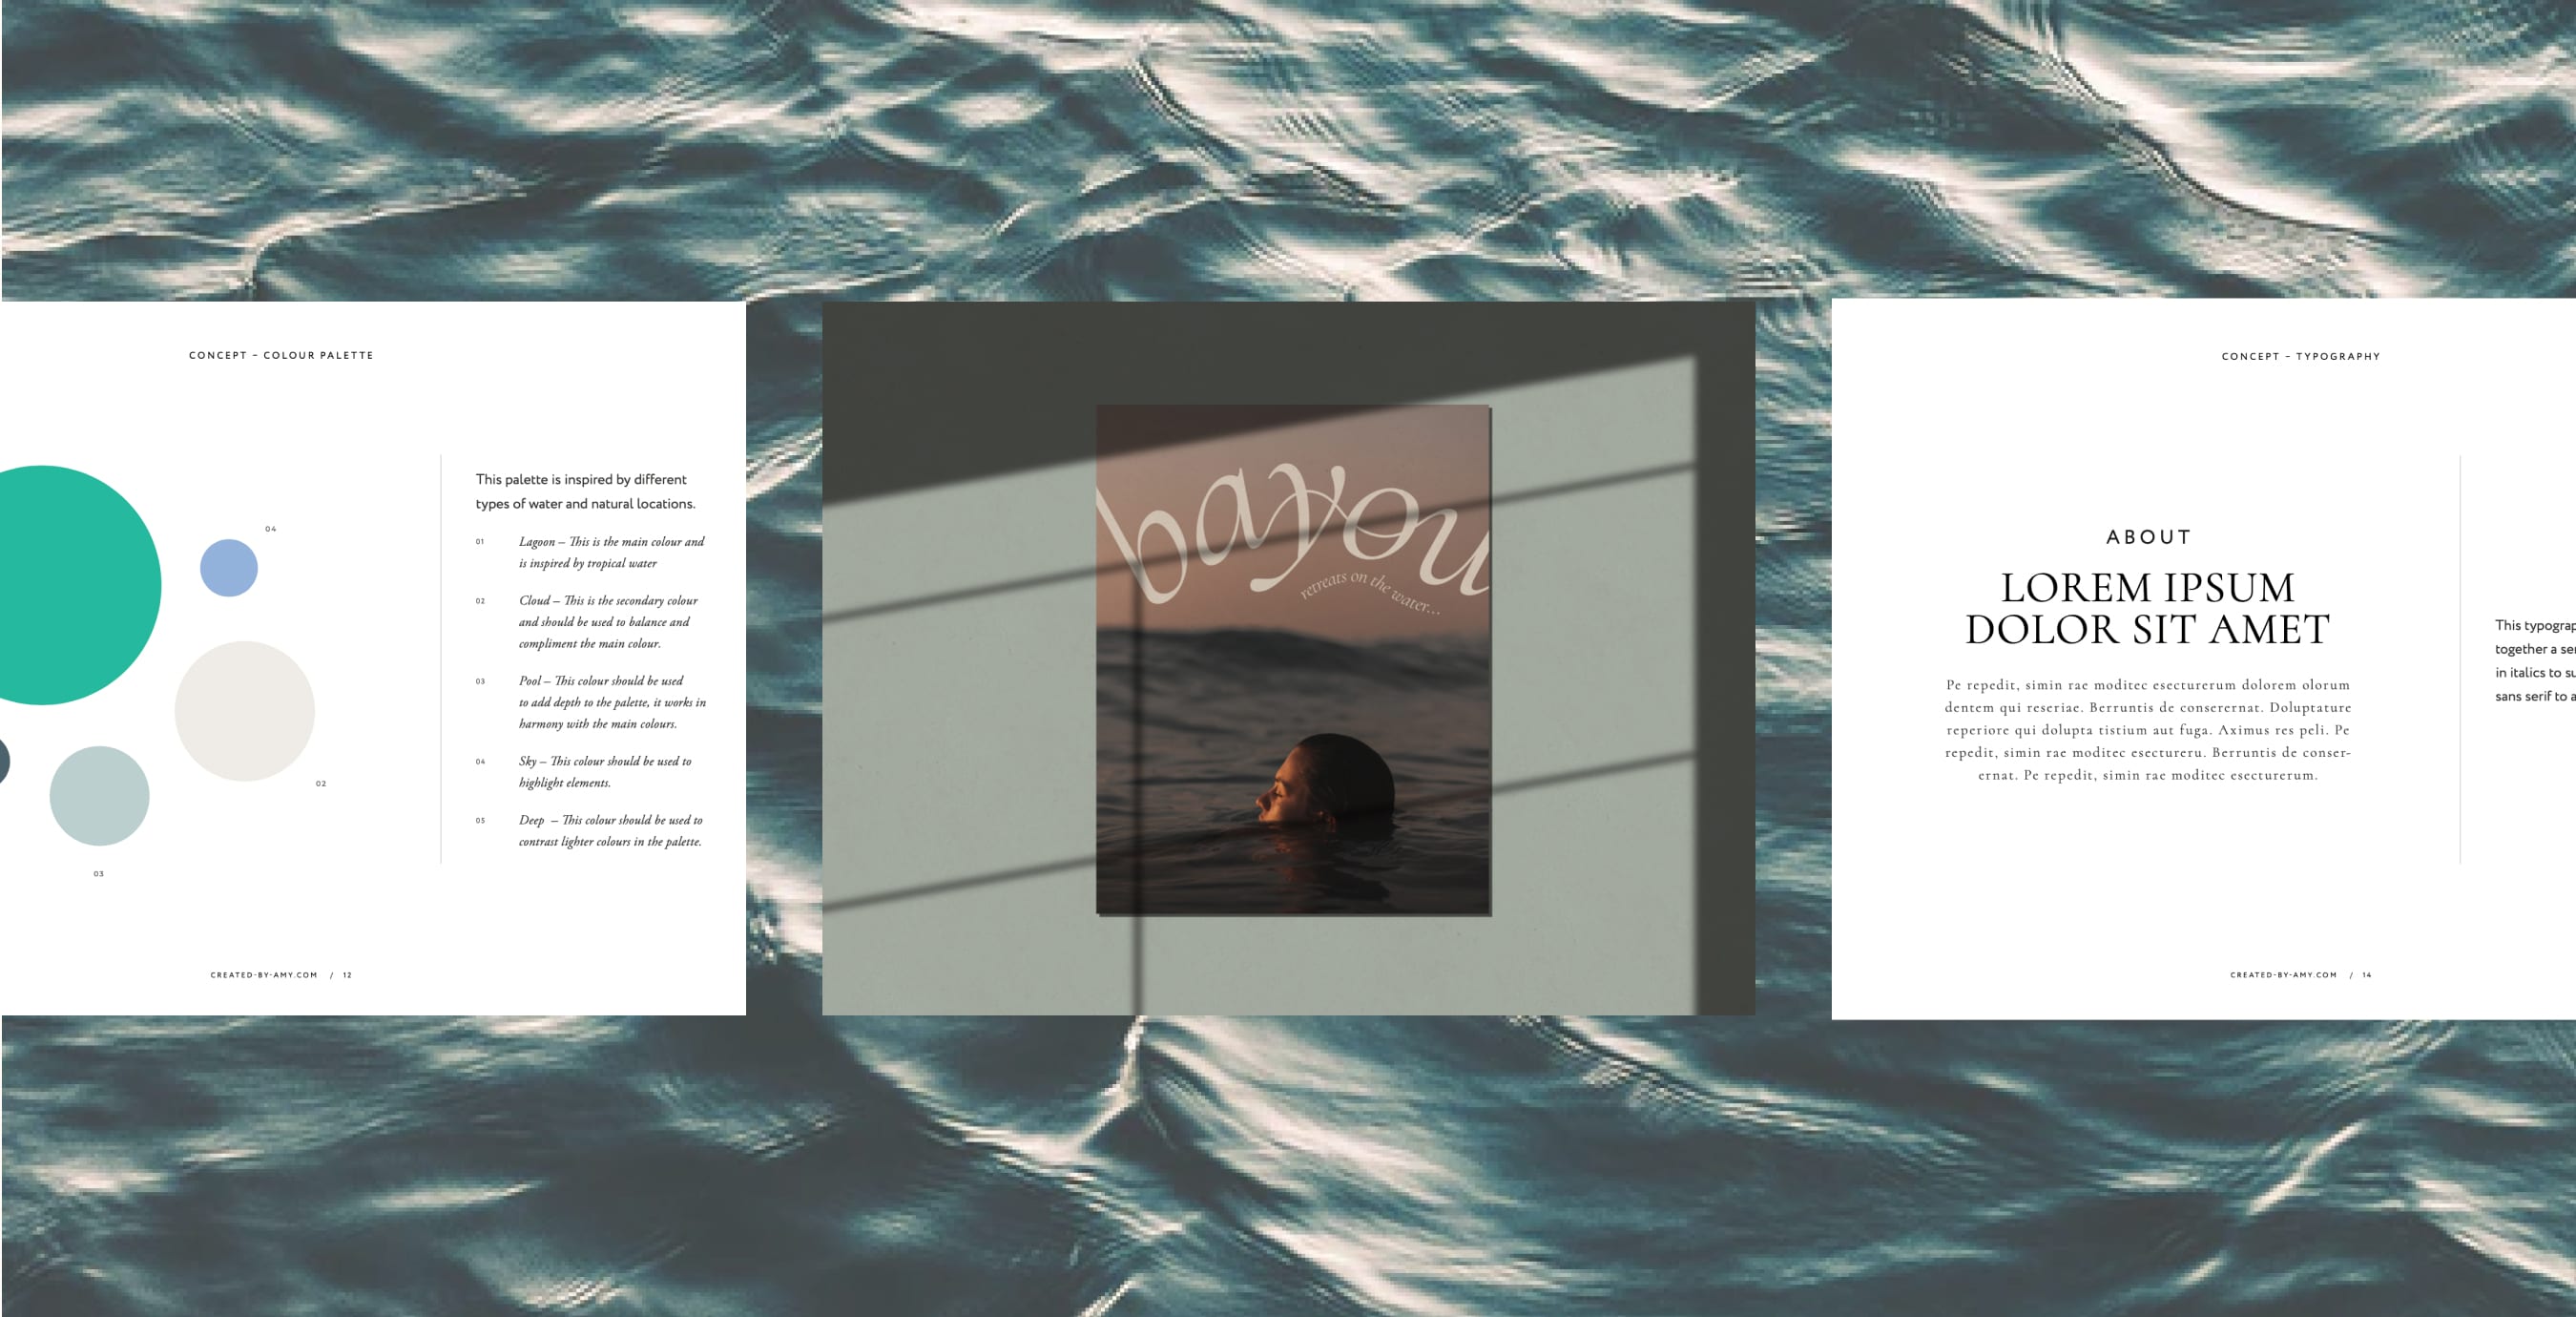
Colours
Colour is personality – give your website some! On Easol, you can use a colour picker or input HEX/RGB codes to add a:
Primary colour – Used for call-to-action buttons
Secondary colour – Used to highlight blocks of content, like product cards
Site background colour – Used for all page backgrounds
Site text colour – Used for all body text
We’ll automatically apply your colour palette across your site. However, you can override your colour palette for specific sections of your site on individual content blocks (we’ll get to that in a bit) or with custom CSS. For more details, check out our article on setting brand colours for your website.
Fonts
Typography is a big part of your branding. That’s why you can upload any custom font (just make sure you have the rights for it). Simply click Add Font, upload your font files, and then select them for your headings and body.
To learn all the tips and tricks for turning your site into your brand’s masterpiece, check out our guide to customising Easol themes and tips for designing your website.
2. Create experiences
The experiences you sell are the heart of your business. From your look to your messaging, everything springs from the experience.
Select experience type
On Easol, you can sell any experience, anywhere, including:
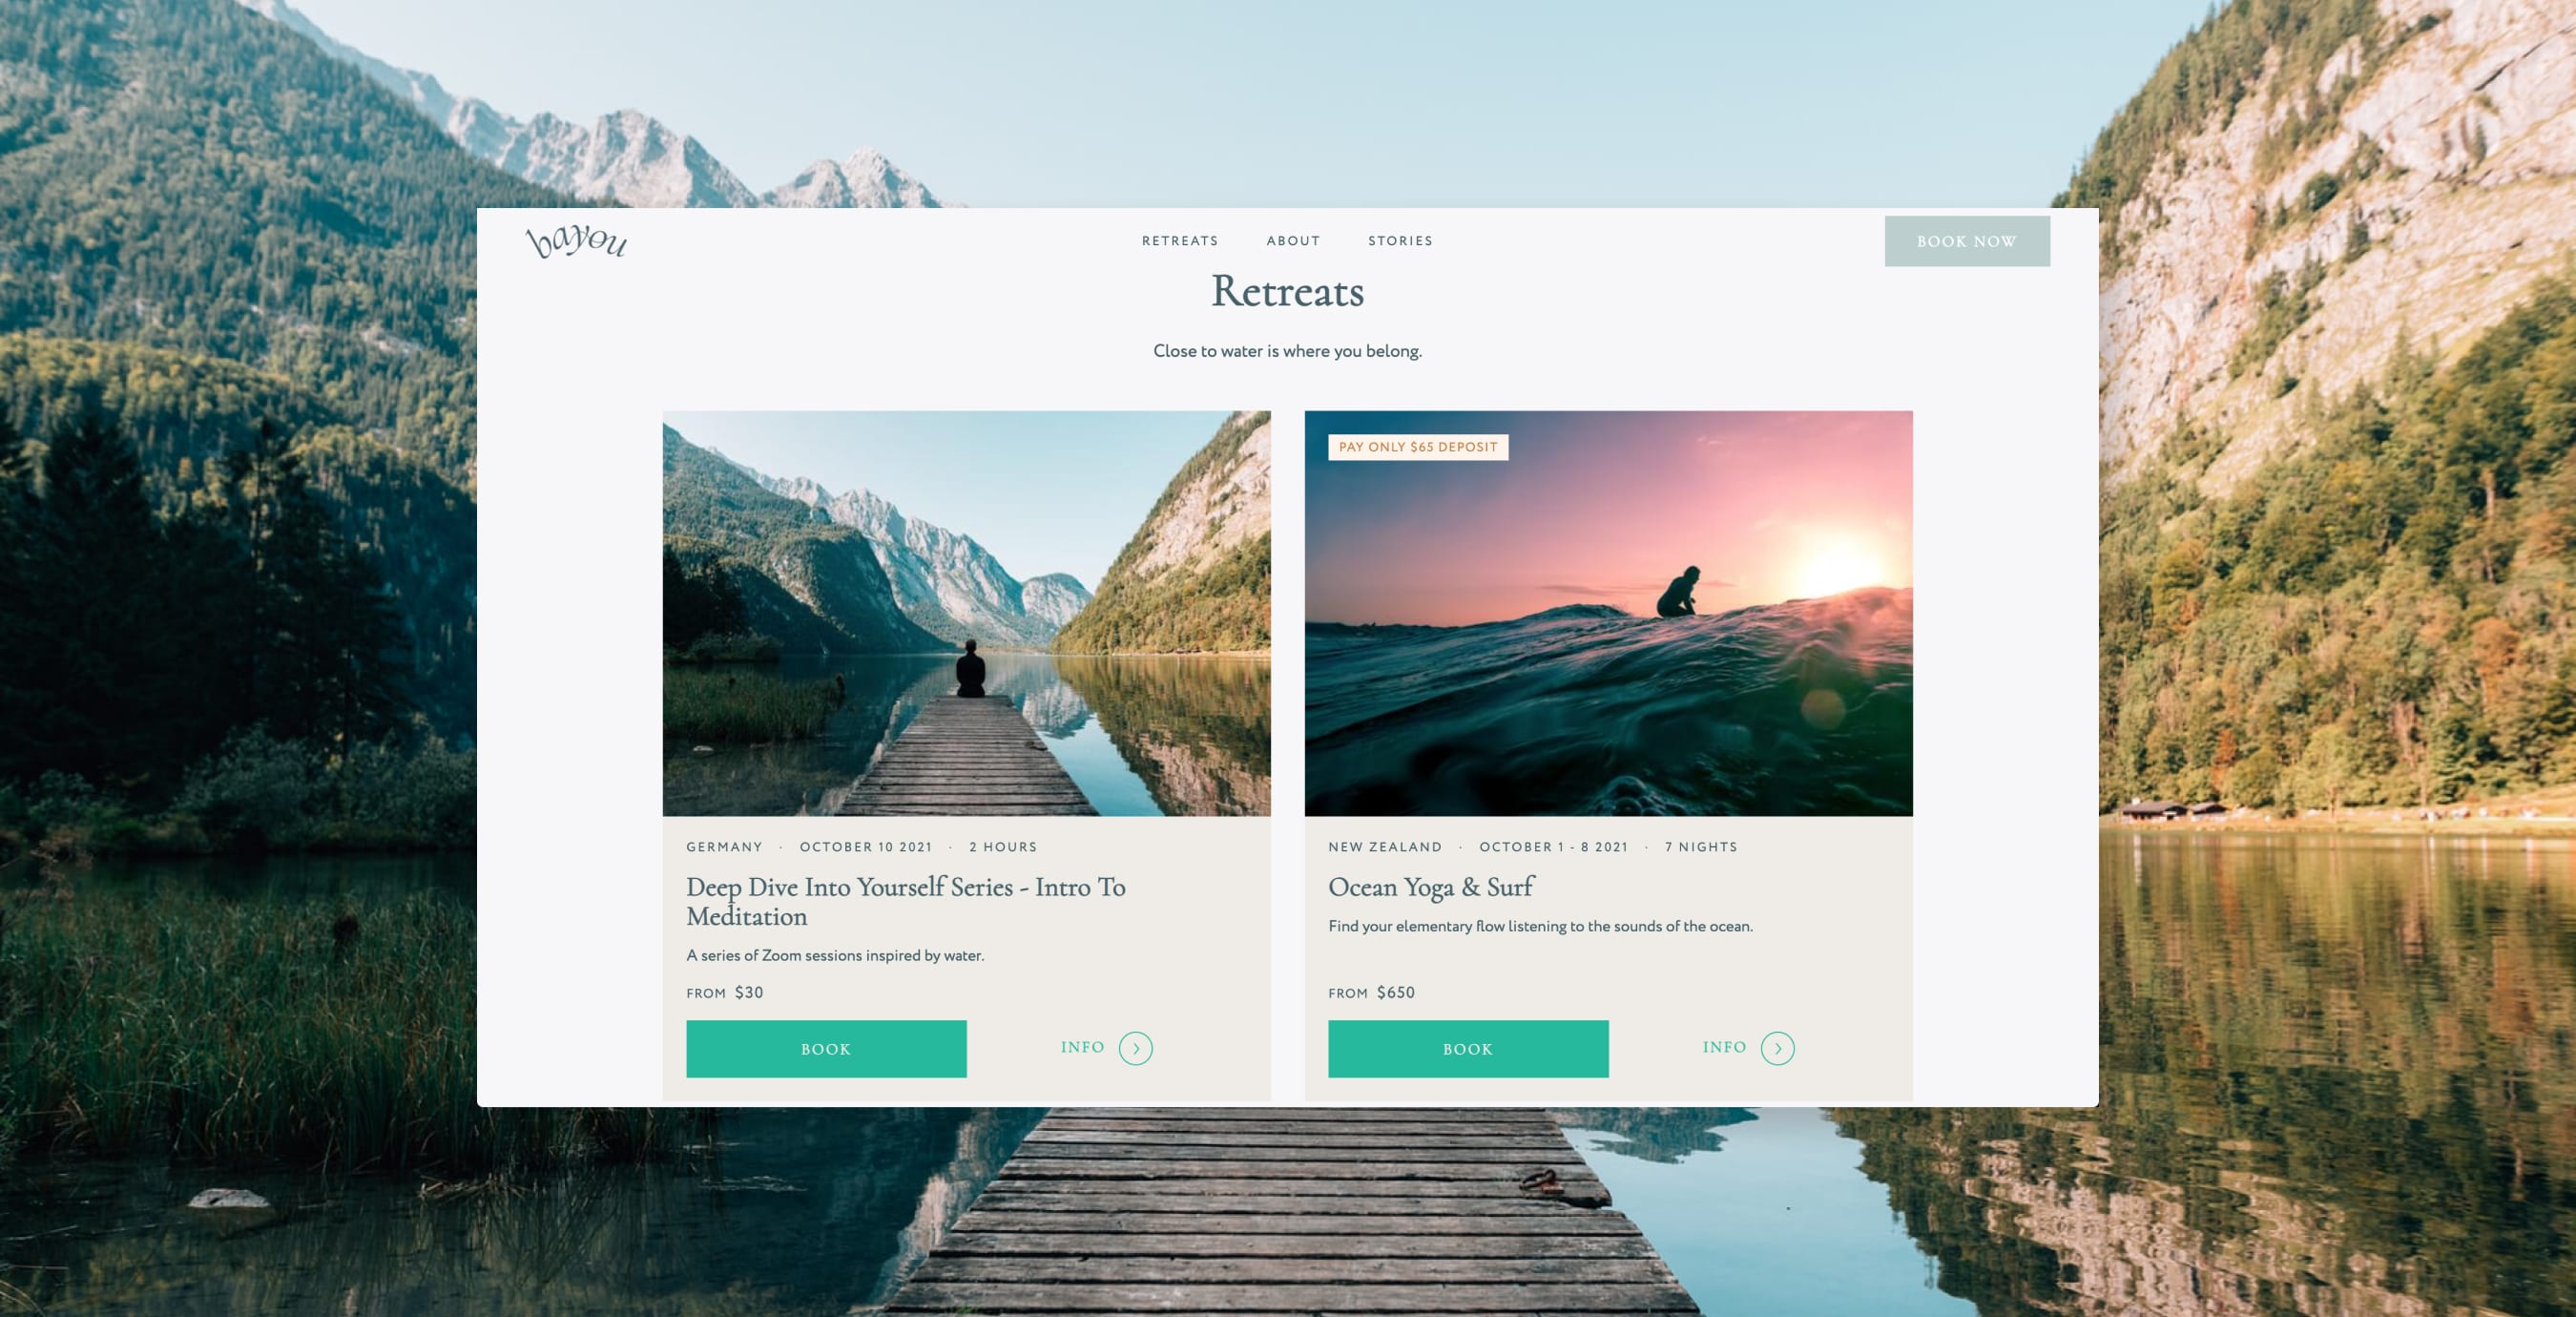
Experiences – Individual events or trips that have a set start and finish date/time. For example, a meditation retreat that runs from Wednesday to Saturday, a virtual cooking class that happens on the first Sunday of every month, or a music festival that takes place once a year.
Accommodations – Properties that have a flexible check-in and check-out date/time. These can be room/unit type properties, like a hotel room, tent, or bed in a shared hostel room – or an entire property, like a villa, rental home, or cabin.
To create an experience, go to Experiences and click Add Experience. For accommodations, go to Accommodations and click Add Accommodation.
If accommodation is included in your experience offering (like a multi-day surf retreat), we recommend setting up your accommodation options as variants (more on that in a bit).
Tip: If you have any questions throughout your launch process, check out our Help Centre, where we have loads of helpful advice. Or you can get in touch with our support team under the Support tab in your dashboard.
Add vital information
Whether you’re creating an experience or accommodation, your next step is to fill out all the basic information, including:
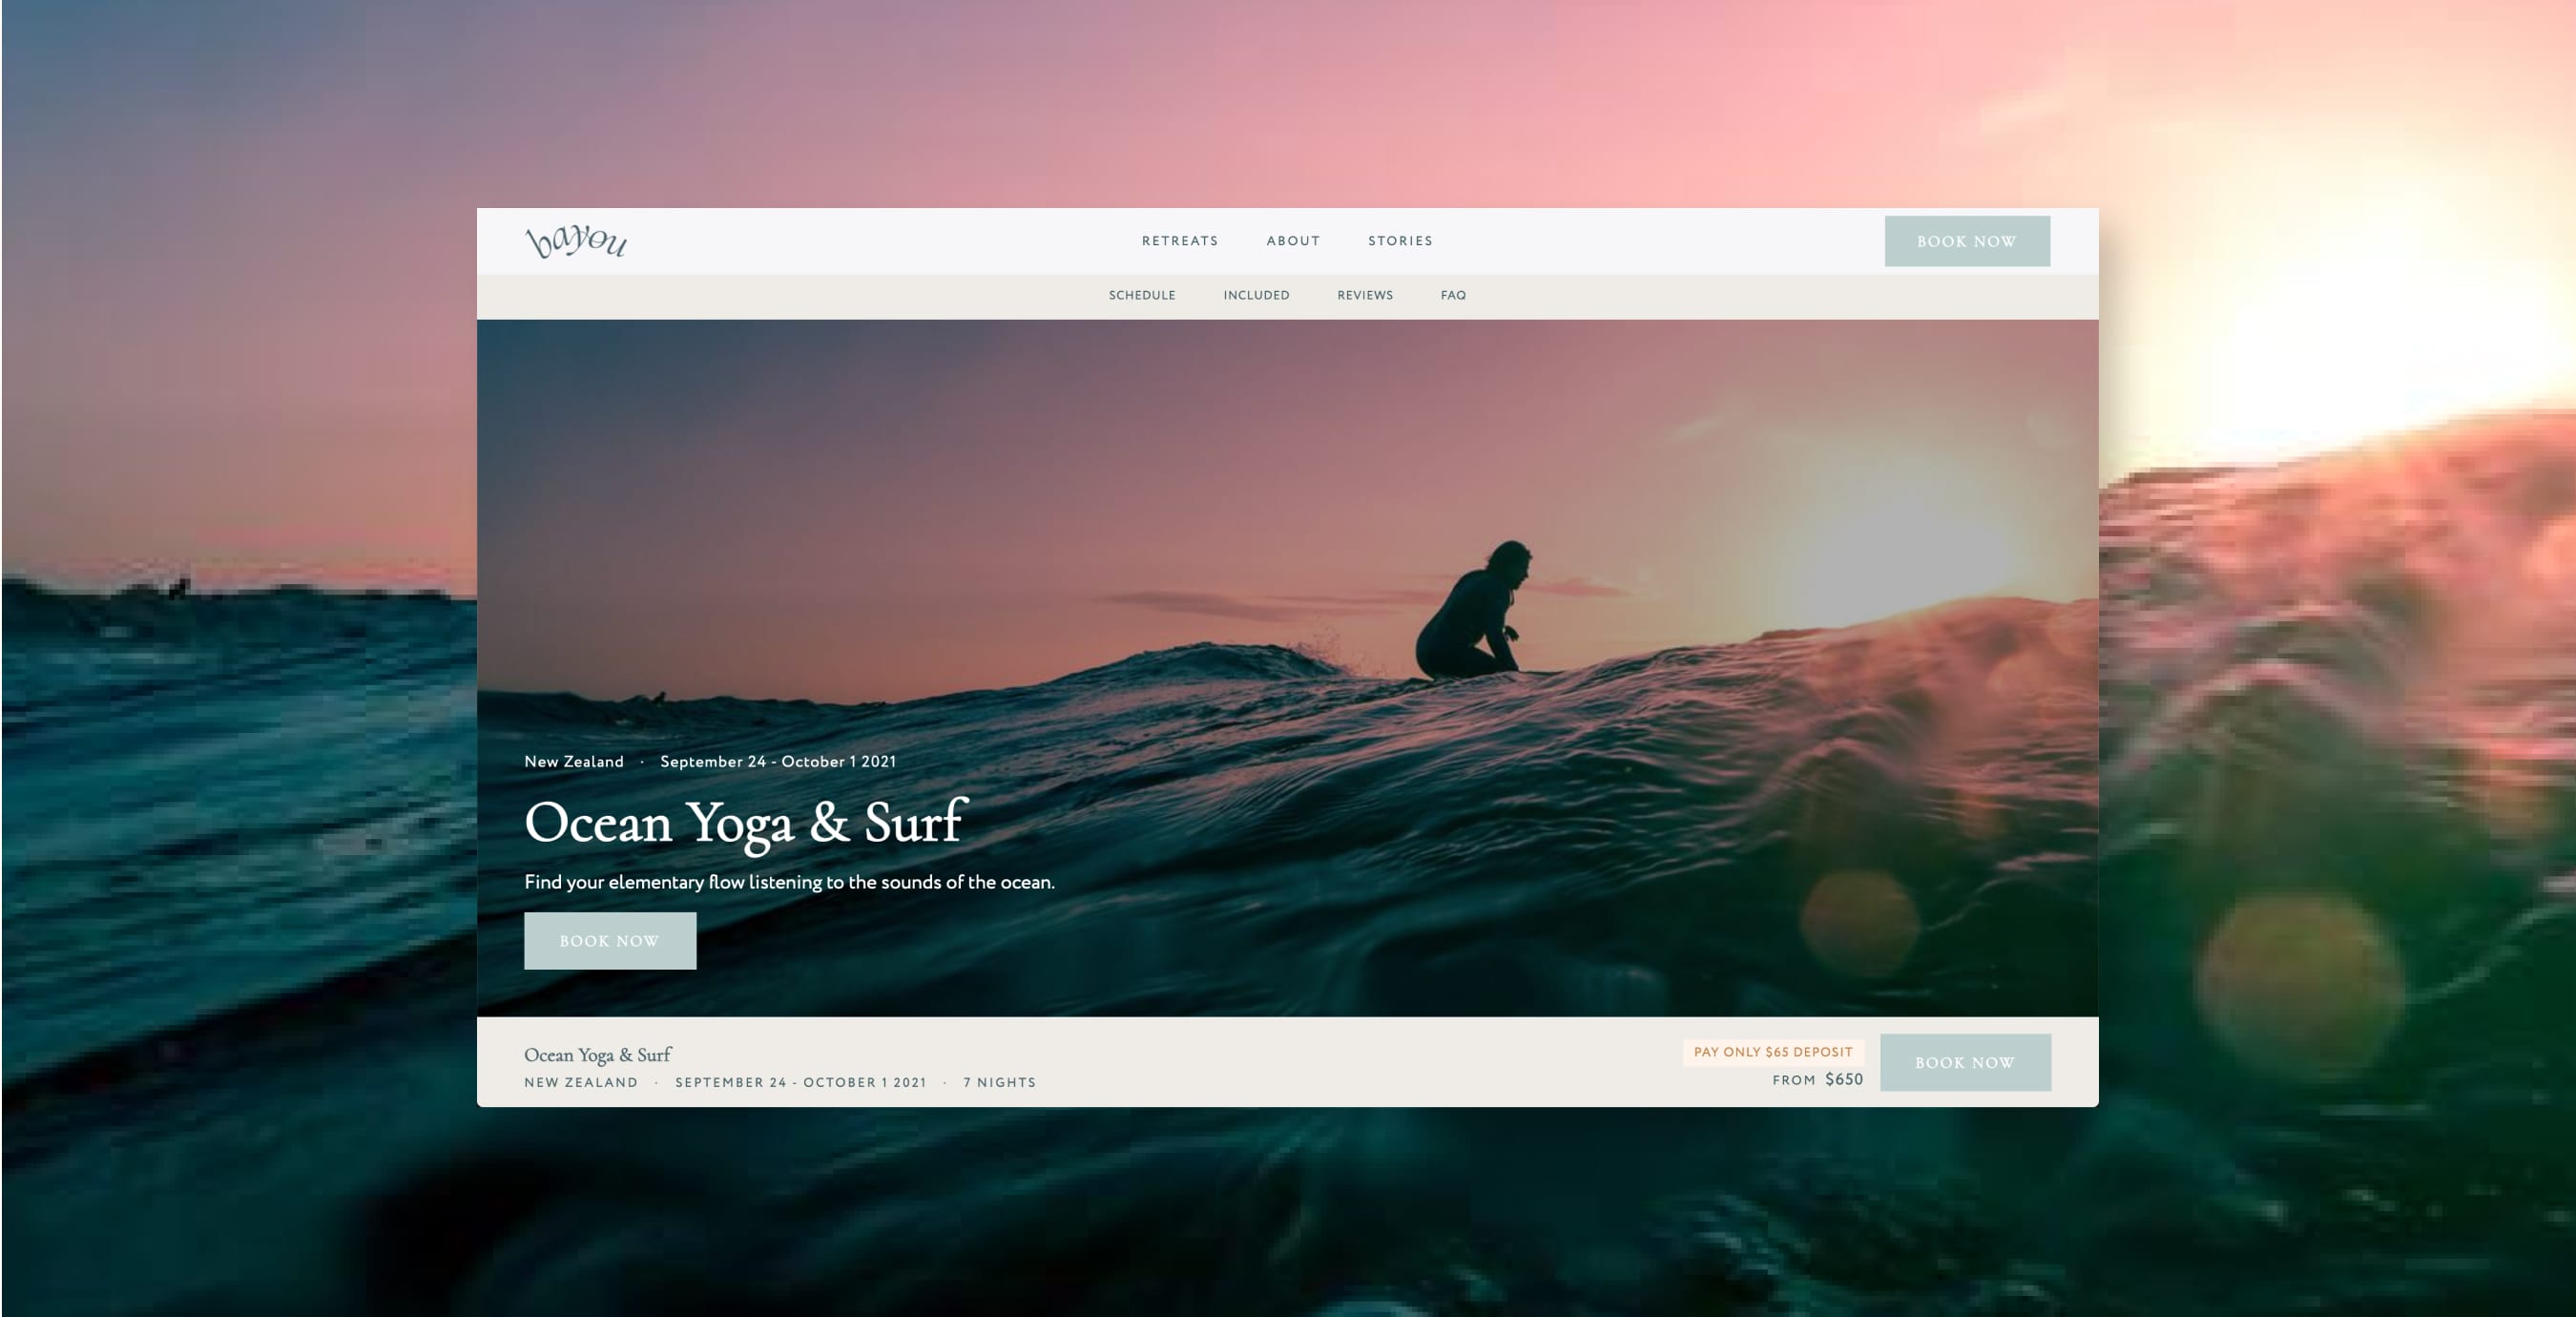
Name and tagline – This is the first thing people read about your experience, so make it count. Keep it short, sweet, and enticing for people to want to learn more.
Overview – Add a more thorough description of your experience and why your customers will love it.
Hero image and overview image – Images can make or break first impressions. That’s why it’s important to use only high-quality photos to represent your experience. We also recommend uploading images in landscape for optimal display.
Start date and duration – For experience offerings, you’ll need to set a start date and duration (this can be in days, hours, or minutes).
Category and subcategory – Select the category and subcategory for your experience or accommodation. Your customers can use these to filter and search everything that you offer on your site.
Location – Provide the main address where your experience or accommodation will take place.
Keep in mind that the name, tagline and hero image will appear on other website pages (e.g. your homepage and checkout page), whereas the overview description and image appears on the individual experience page (see examples on Lucid of an event and accommodation here).
You can edit all of this information, so don’t worry if you’re not sure what to write on your first go.
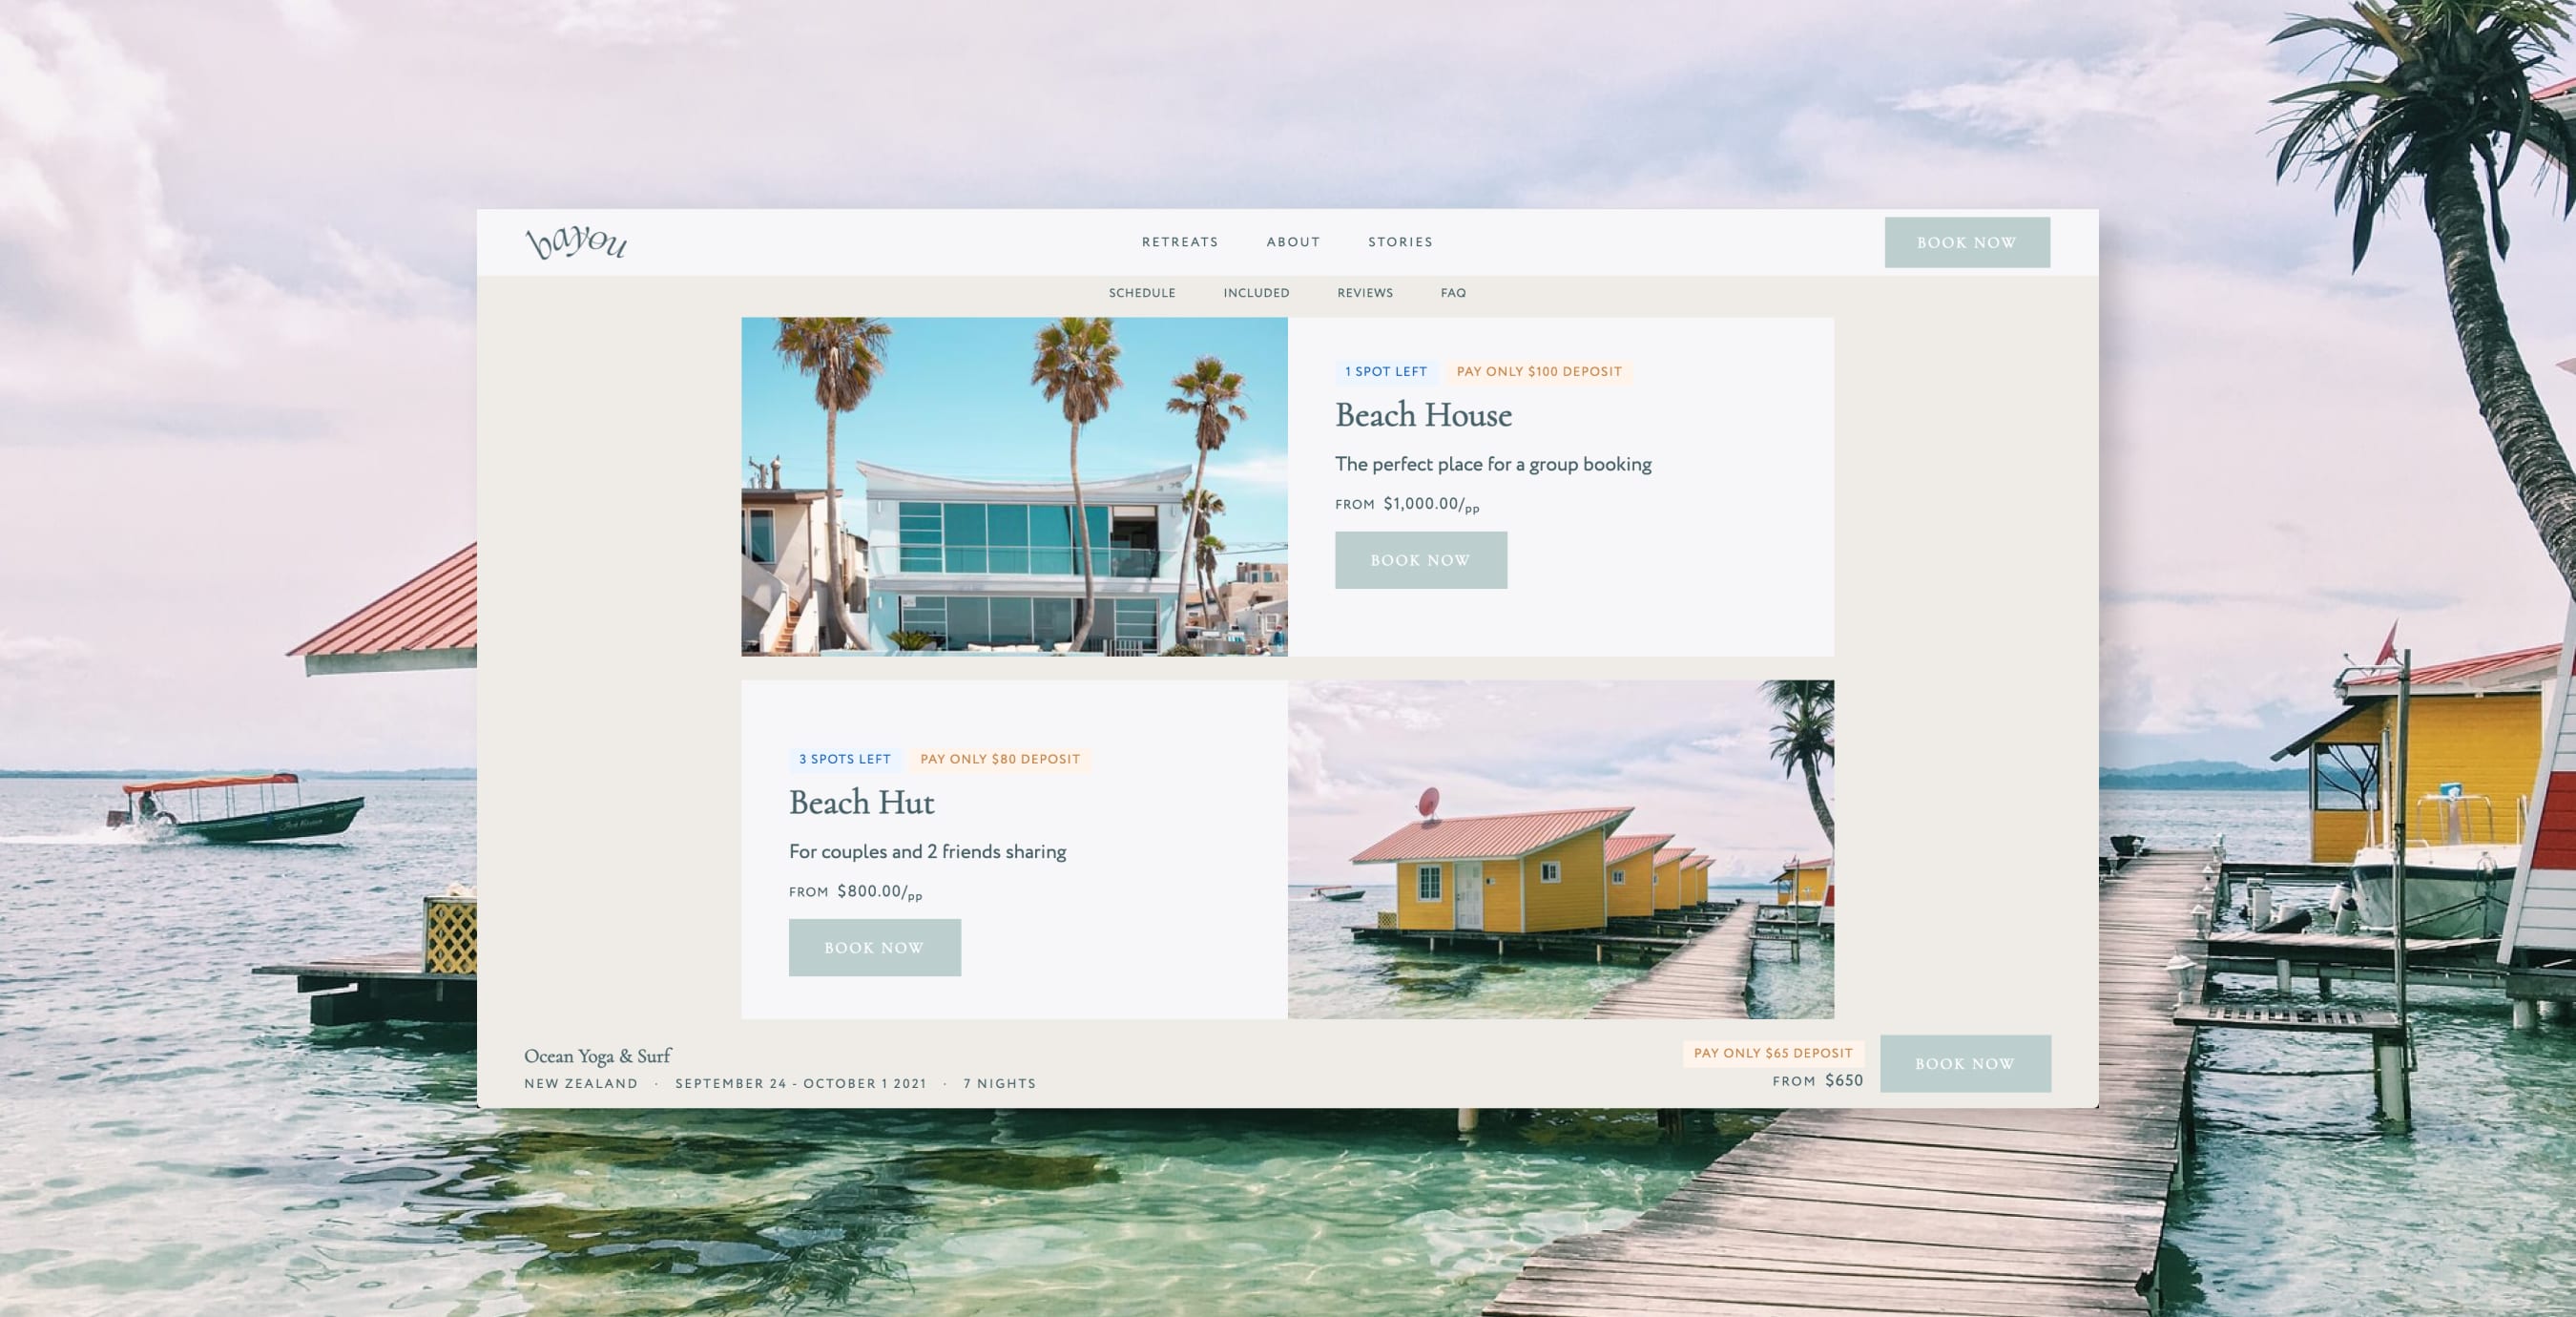
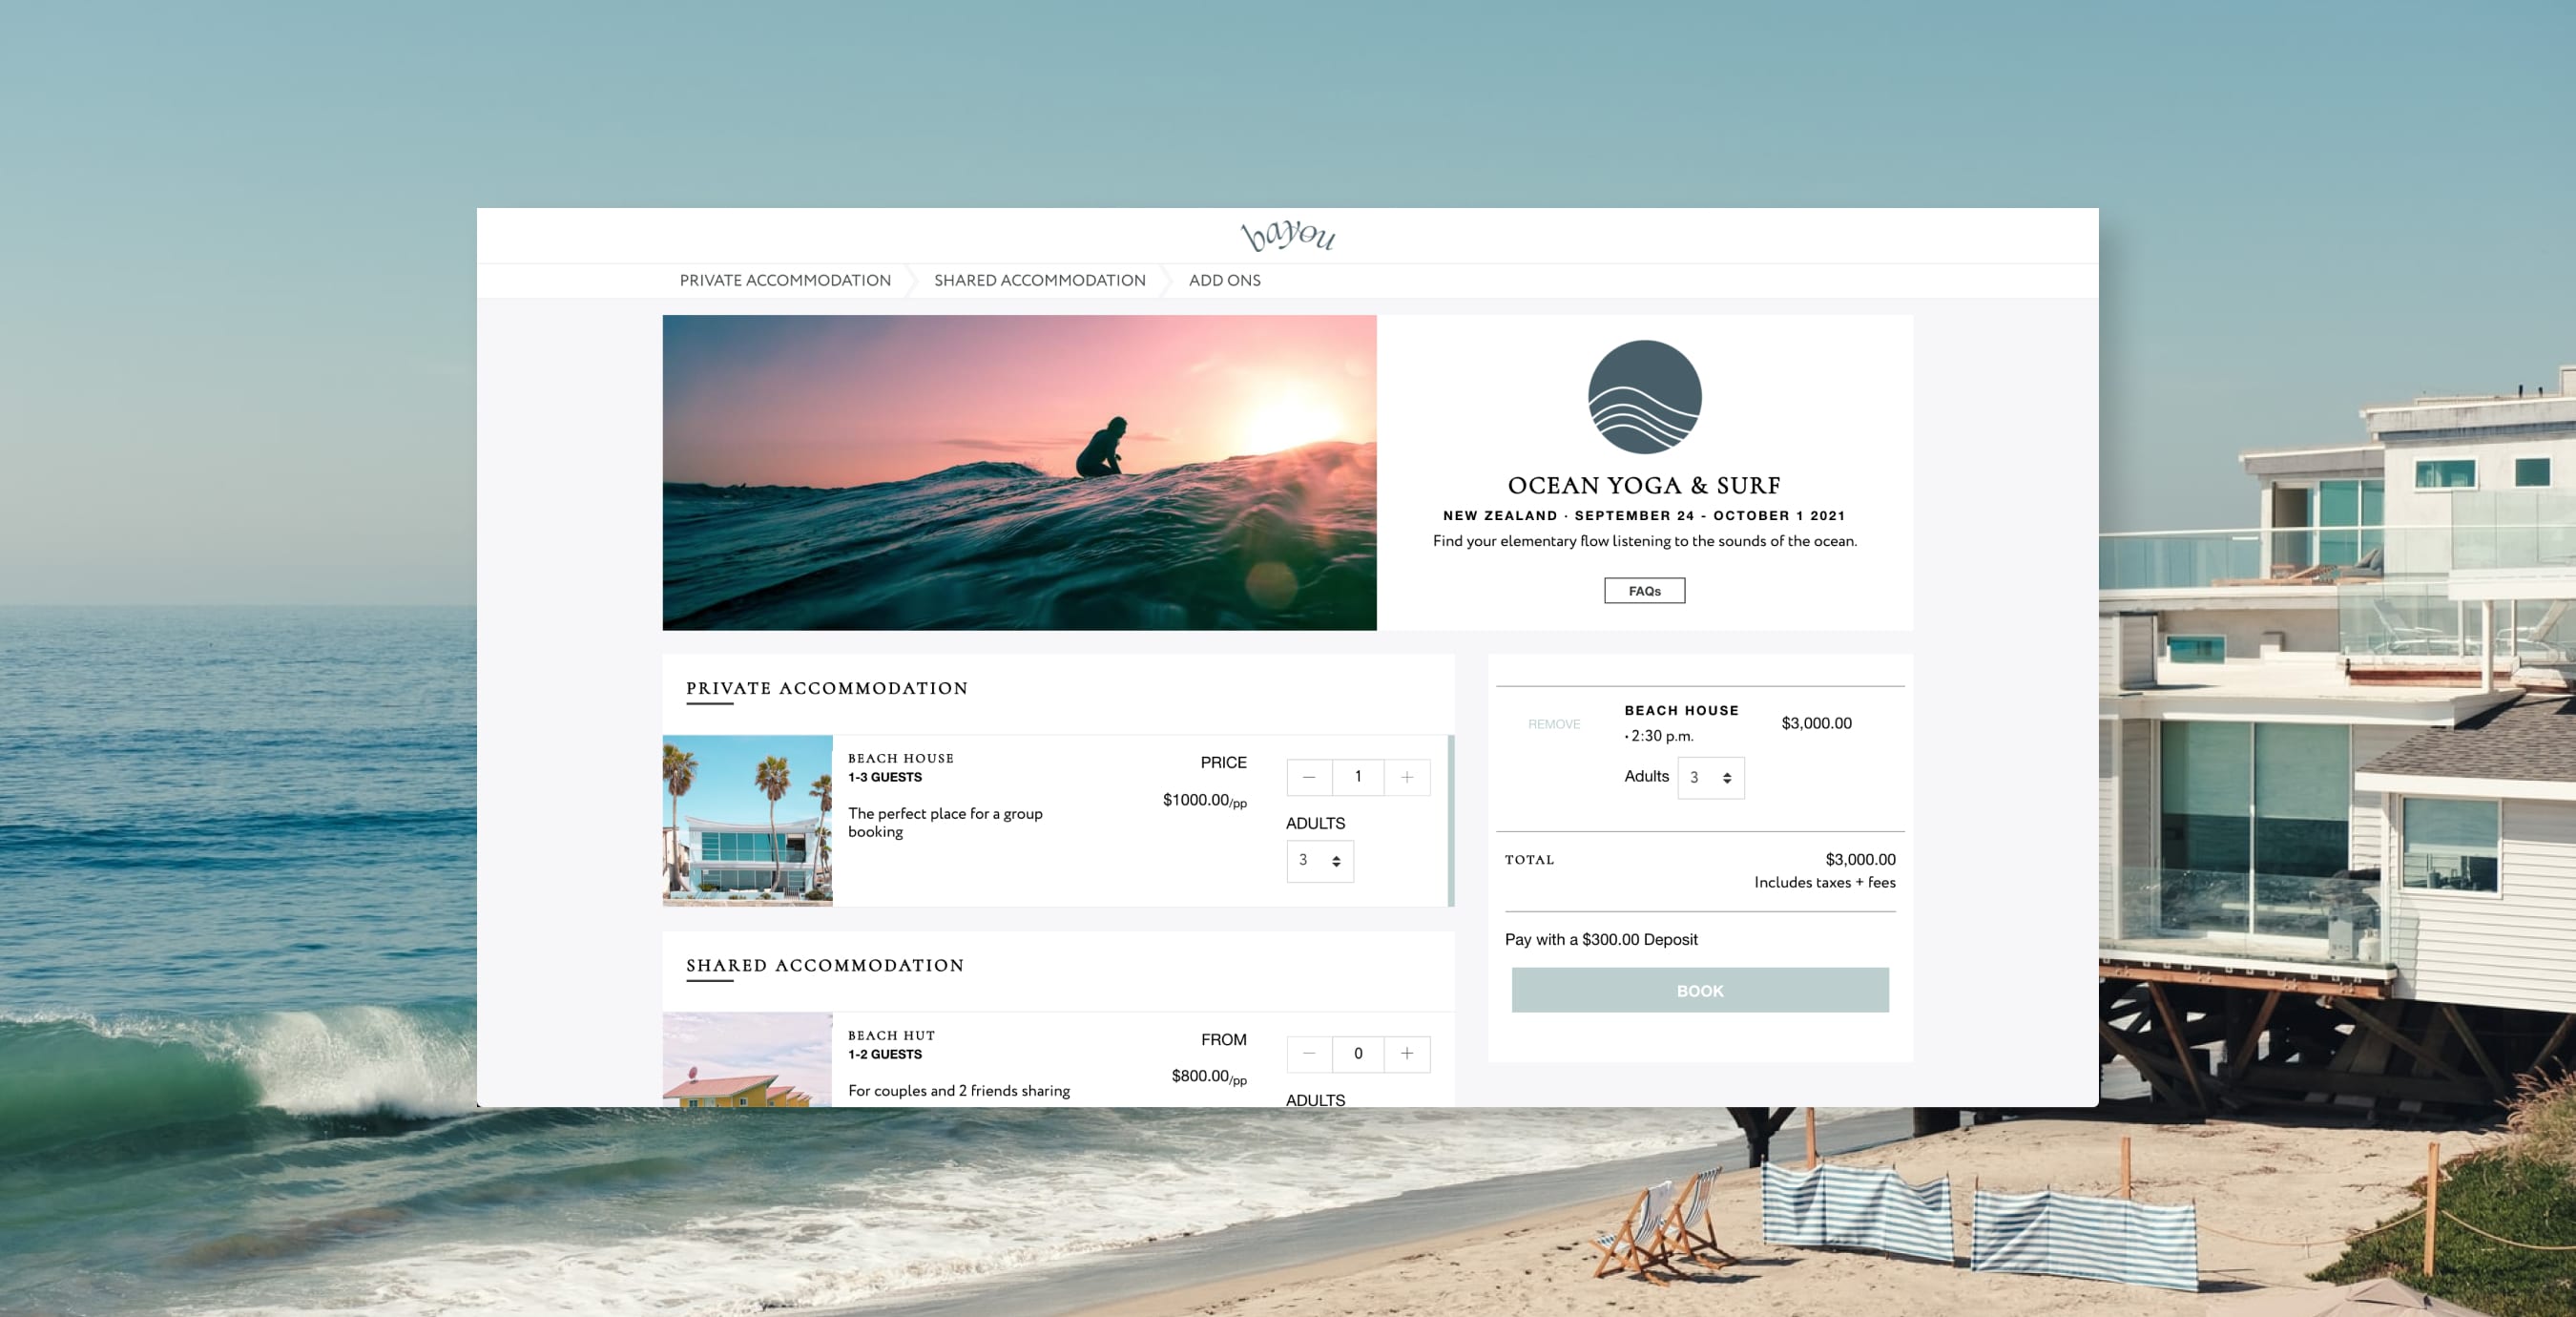
Set up your pricing
To set up pricing for your experience offerings, you’ll need to create a variant under the Variants tab. A variant refers to any option within an experience or accommodation sold – they’re the items your customers will buy at checkout. For example, a room option (double or junior suite), a ticket option (early bird or VIP) or a time slot (an hour or a day).
For experiences, there are two types of variants you can create:
Per person variant – You can use this for anything you sell on a per person basis, like an entry ticket that admits one person to your experience.
Per unit variant – Use this to set a per person pricing and a maximum occupancy. This is great for options that accommodate more than one person, like a group ticket or a double room that can be booked by either two guests coming together or a single person. You can also set tiered pricing depending on the number of guests booking, which means you can increase pricing if only a solo guest is booking.
For accommodations, there’s only one type of variant: per night variant.
When creating variants, consider the following details:
Title – Give your variant a memorable, meaningful title.
Price – On a per person, per unit or per night basis.
Tagline – Provide some more information on how the variant is different from other options.
Stock inventory – Set the total number of stock available to ensure you don’t sell more than you have.
Booking fee percentage (optional) – Override your company-wide booking fee for the individual variant.
Allocation (optional) – Capture more information about your guest at checkout, e.g. arrival flight details, dietary notes, date of birth.
Check in (optional) – Capture more information about your guest after booking.
If you’d like to provide additional options to your experiences or accommodations at the time of booking, head over to the Modifiers tab. Here you can map options to your variants, such as time slots and meal types. You can also set available stock for each modifier if there’s a limited supply.
Tip: Create segments for your variants and modifiers to group them by theme, like date or activity. Even if you don’t have themes, we recommend you add segments as they become titles in the checkout page.
Merchandise your experience
Now let’s take a look at the Merchandise tab of your experience. To help boost sales, you can provide additional details and highlight key selling points by merchandising your experiences and accommodations. This merchandising section gives you a variety of content fields to help build out your experience page. It won’t just make your experience pages look incredible – it’ll also give your customers the information they need to make a booking.
These content fields include:
Gallery – Show off your experience with stunning photography. Add up to 10 images.
Highlights – Feature unique selling points about your product, like special parties, guest artists, food, workshops or keynote speakers. Think about what makes your experience different compared to everything else out there.
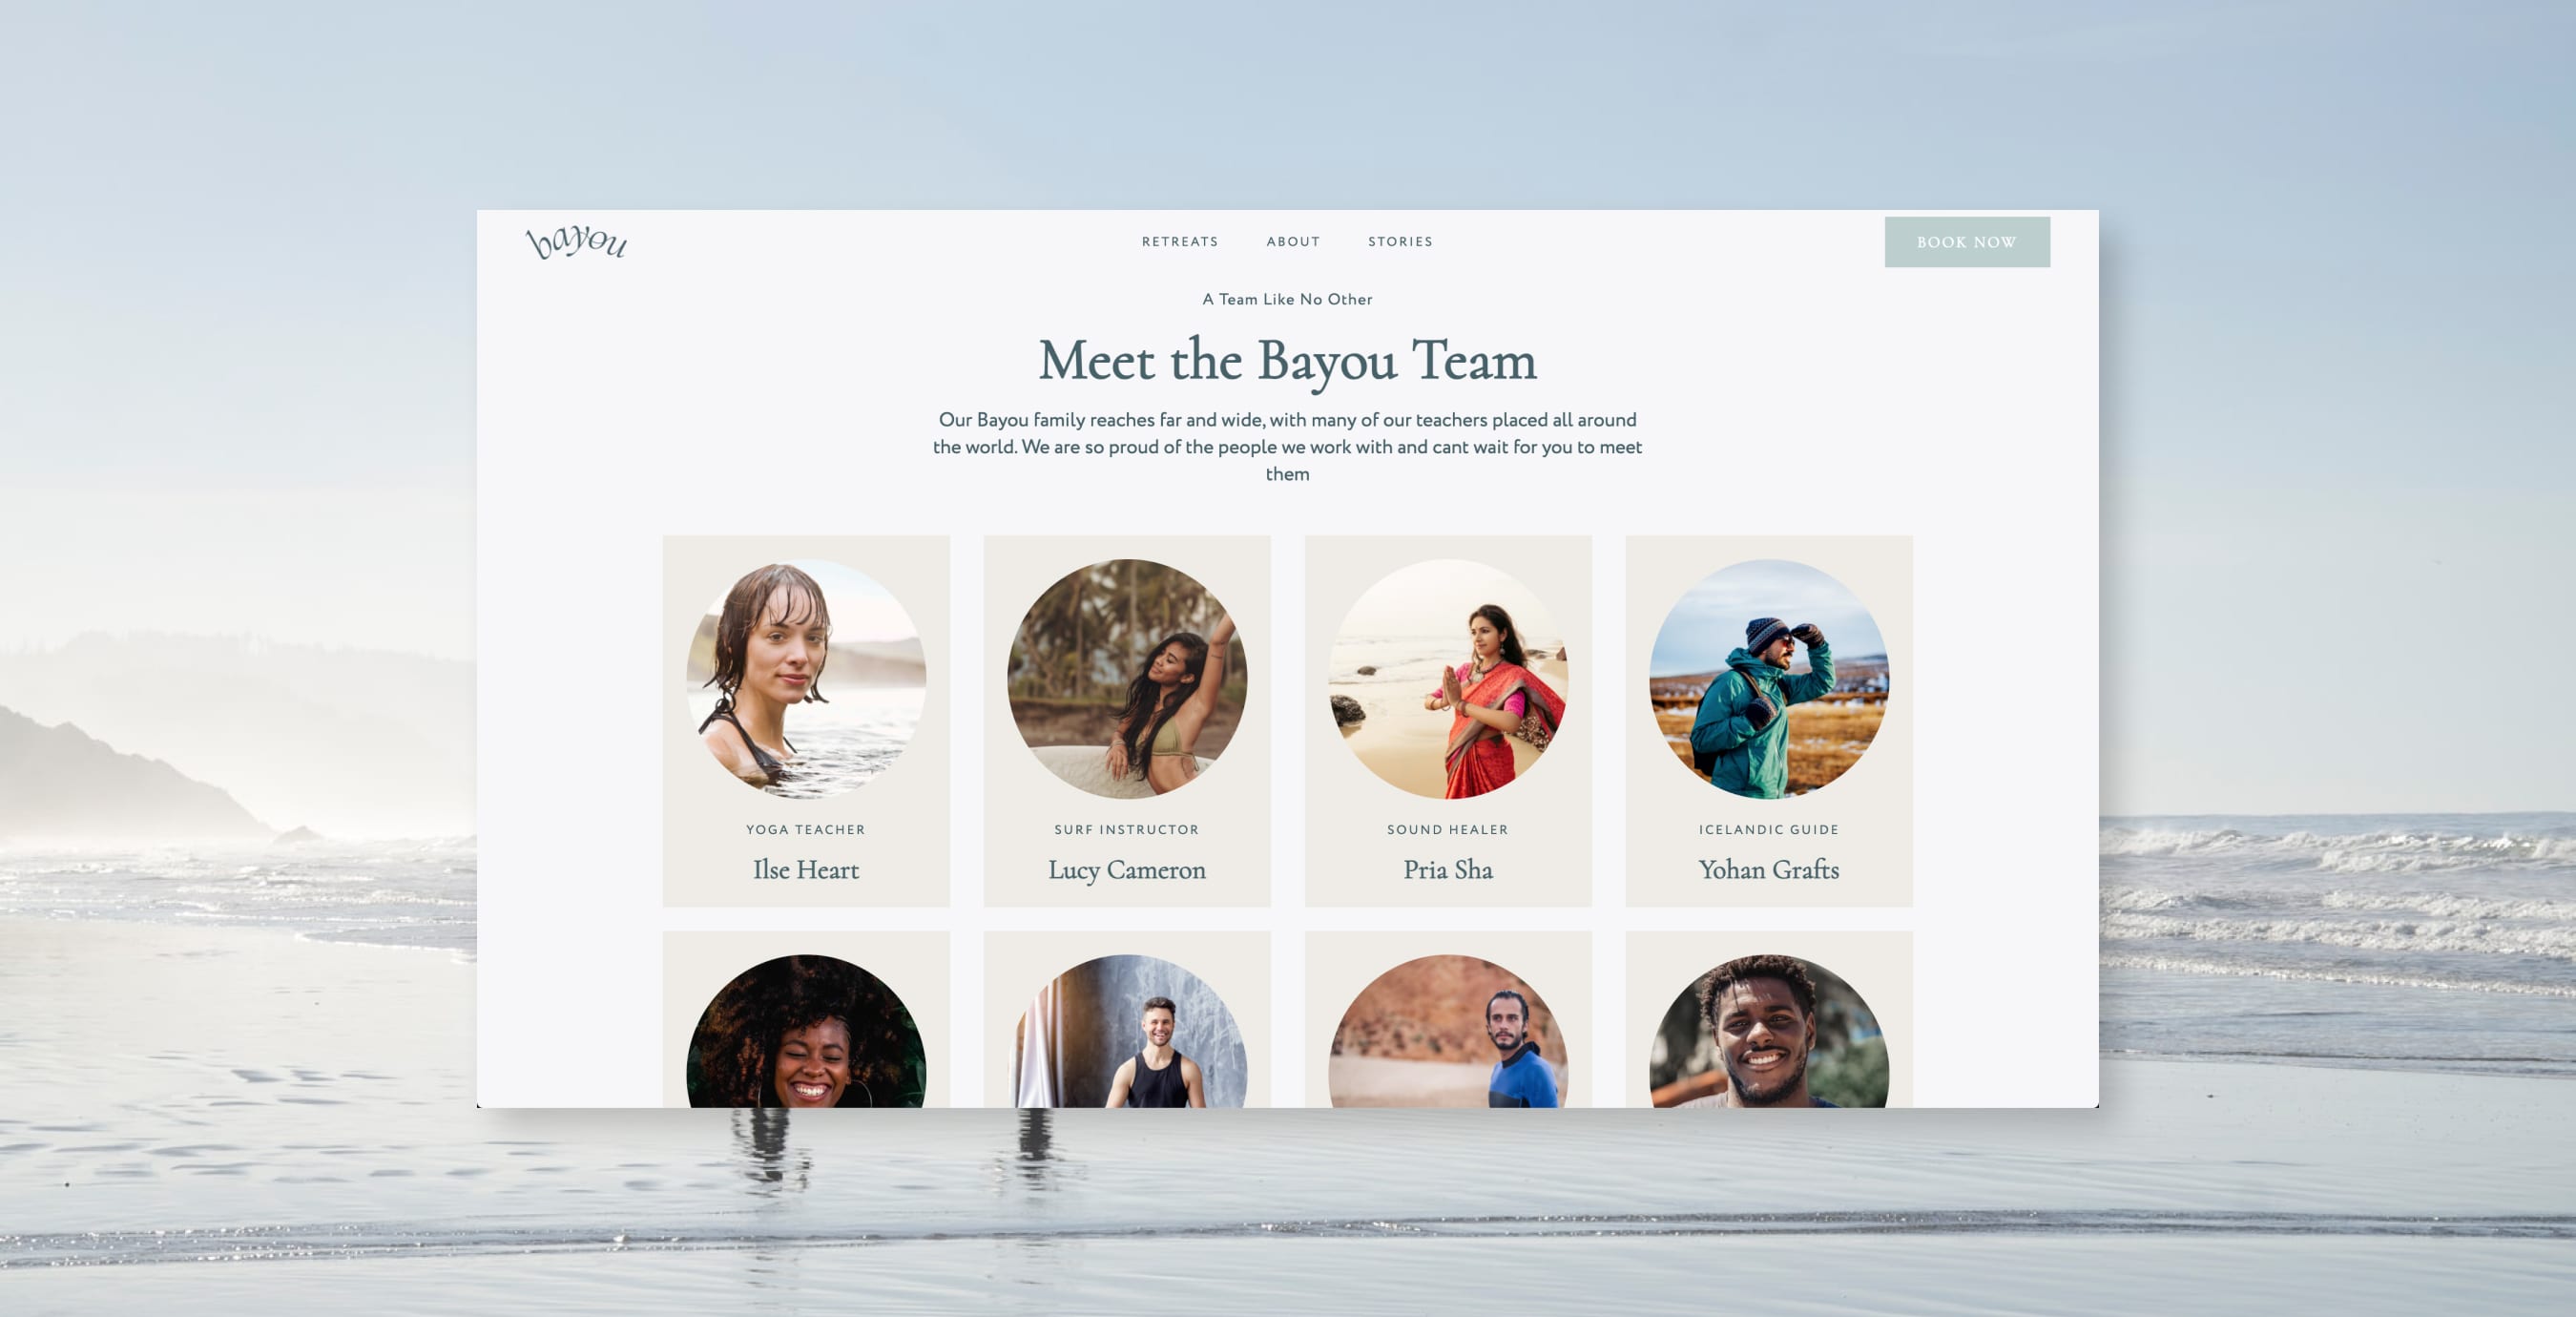
Hosts – Let your customers know who will be running the experience and create familiarity. You can add an image, description, and social links for your hosts.
Schedule – Create an itinerary for your guests to see ahead of booking. This section gives you flexibility in how you break down your schedule, whether you want to show what happens day by day or a snapshot of what a typical day looks like. You can also add in local information as well as what’s included and excluded on any given day.
What's included – List the amenities and features that are included and excluded in your experience so your customers know what to expect.
Venue – Showcase the location of your experience.
Trip tips – Give insider tips on things to plan and do as part of the experience, like local restaurant recommendations or things to pack.
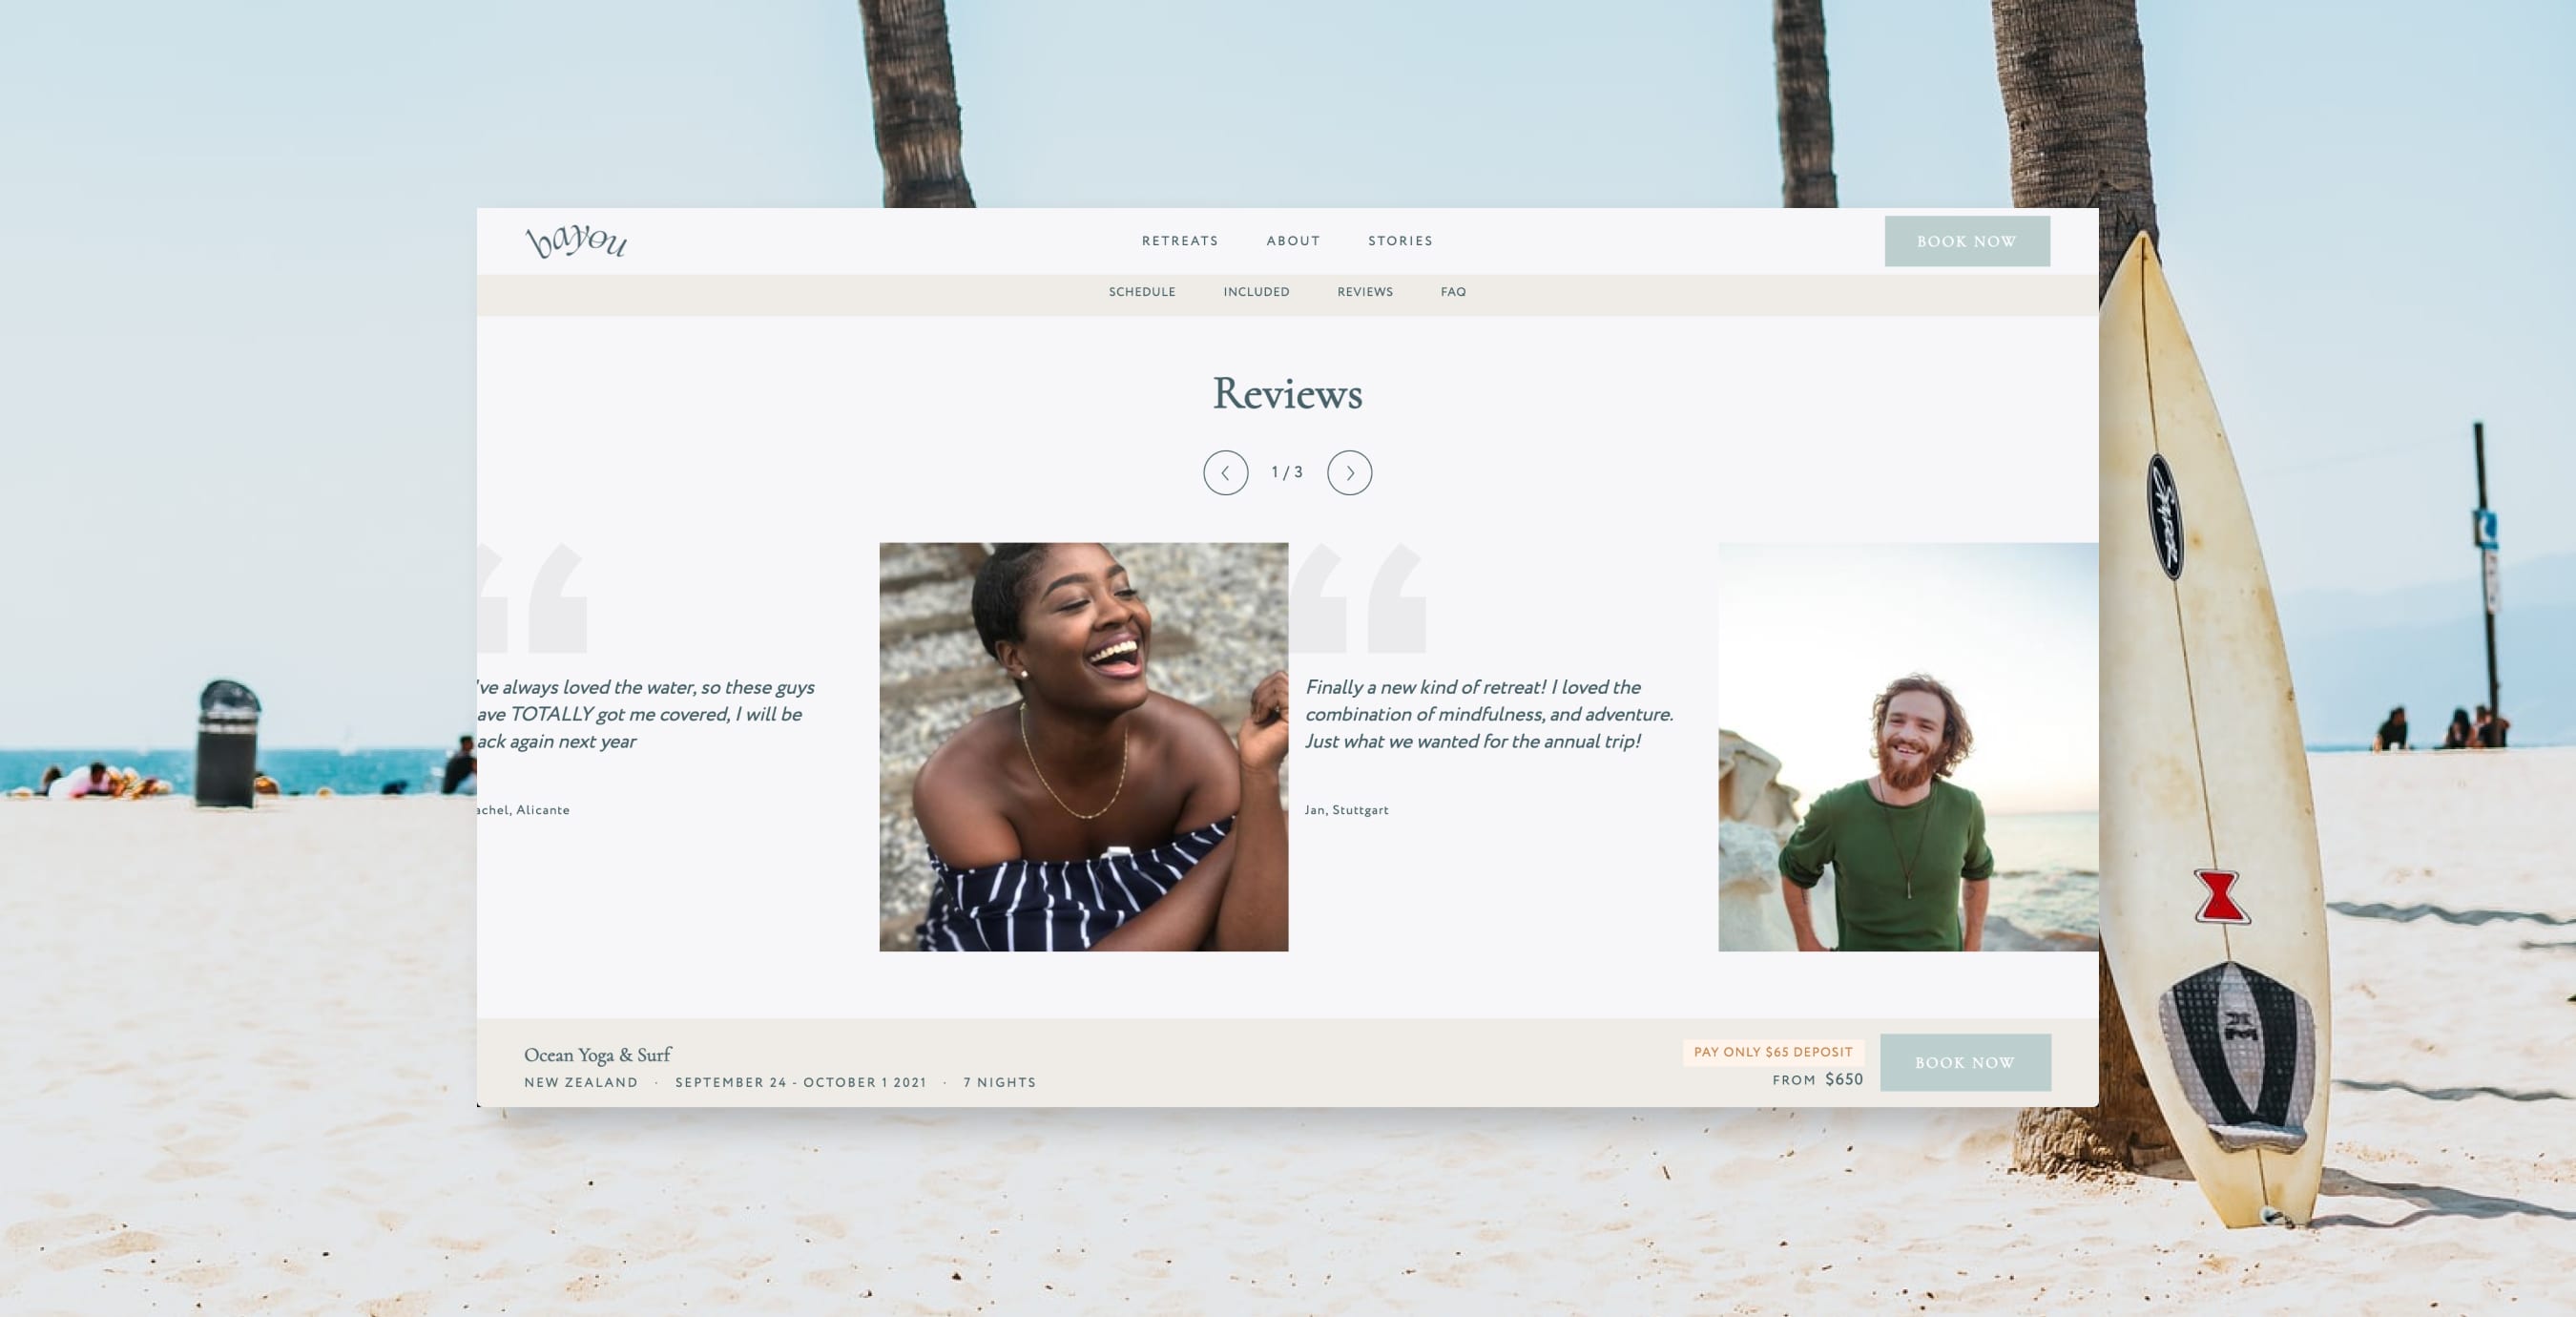
Testimonials – Use testimonials from previous customers and press to build trust with new customers.
Accommodations – Add more information about accommodation options. This is great for experiences that have multiple destinations, like a multi-day tour.
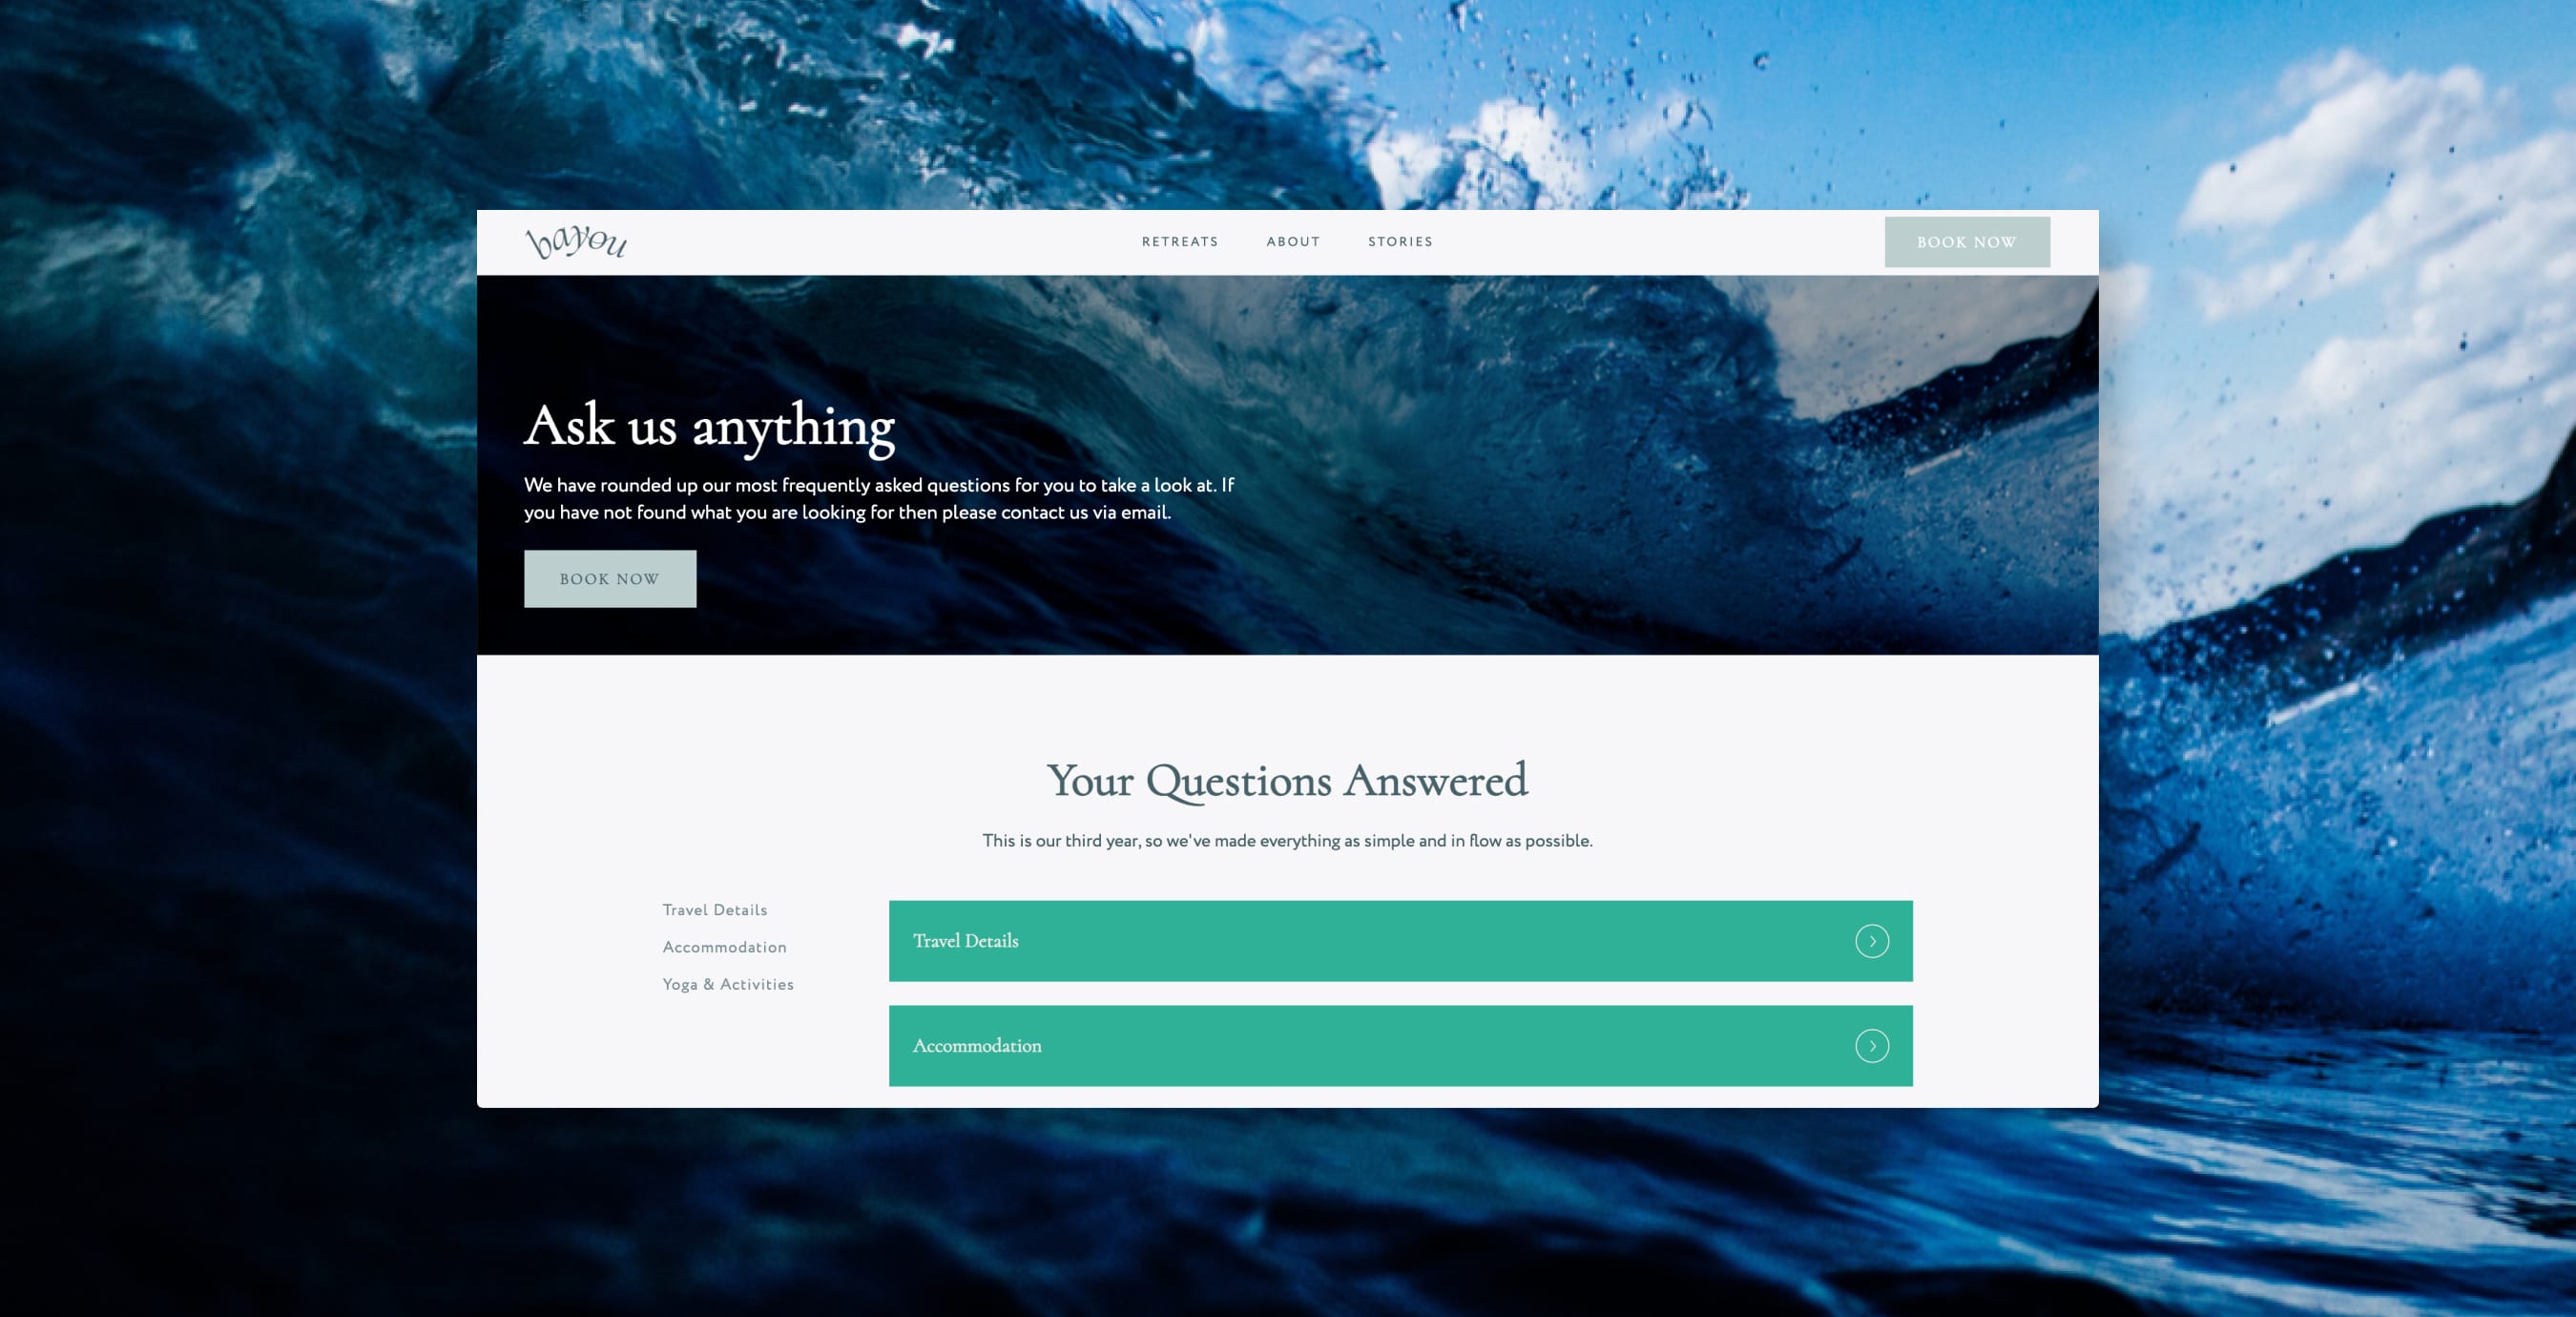
FAQ – Help potential guests understand your experience and find answers to common questions.
All of these fields are optional, but we recommend filling out as many as possible to increase conversions. The more detailed your experiences are, the more likely a customer is to buy.
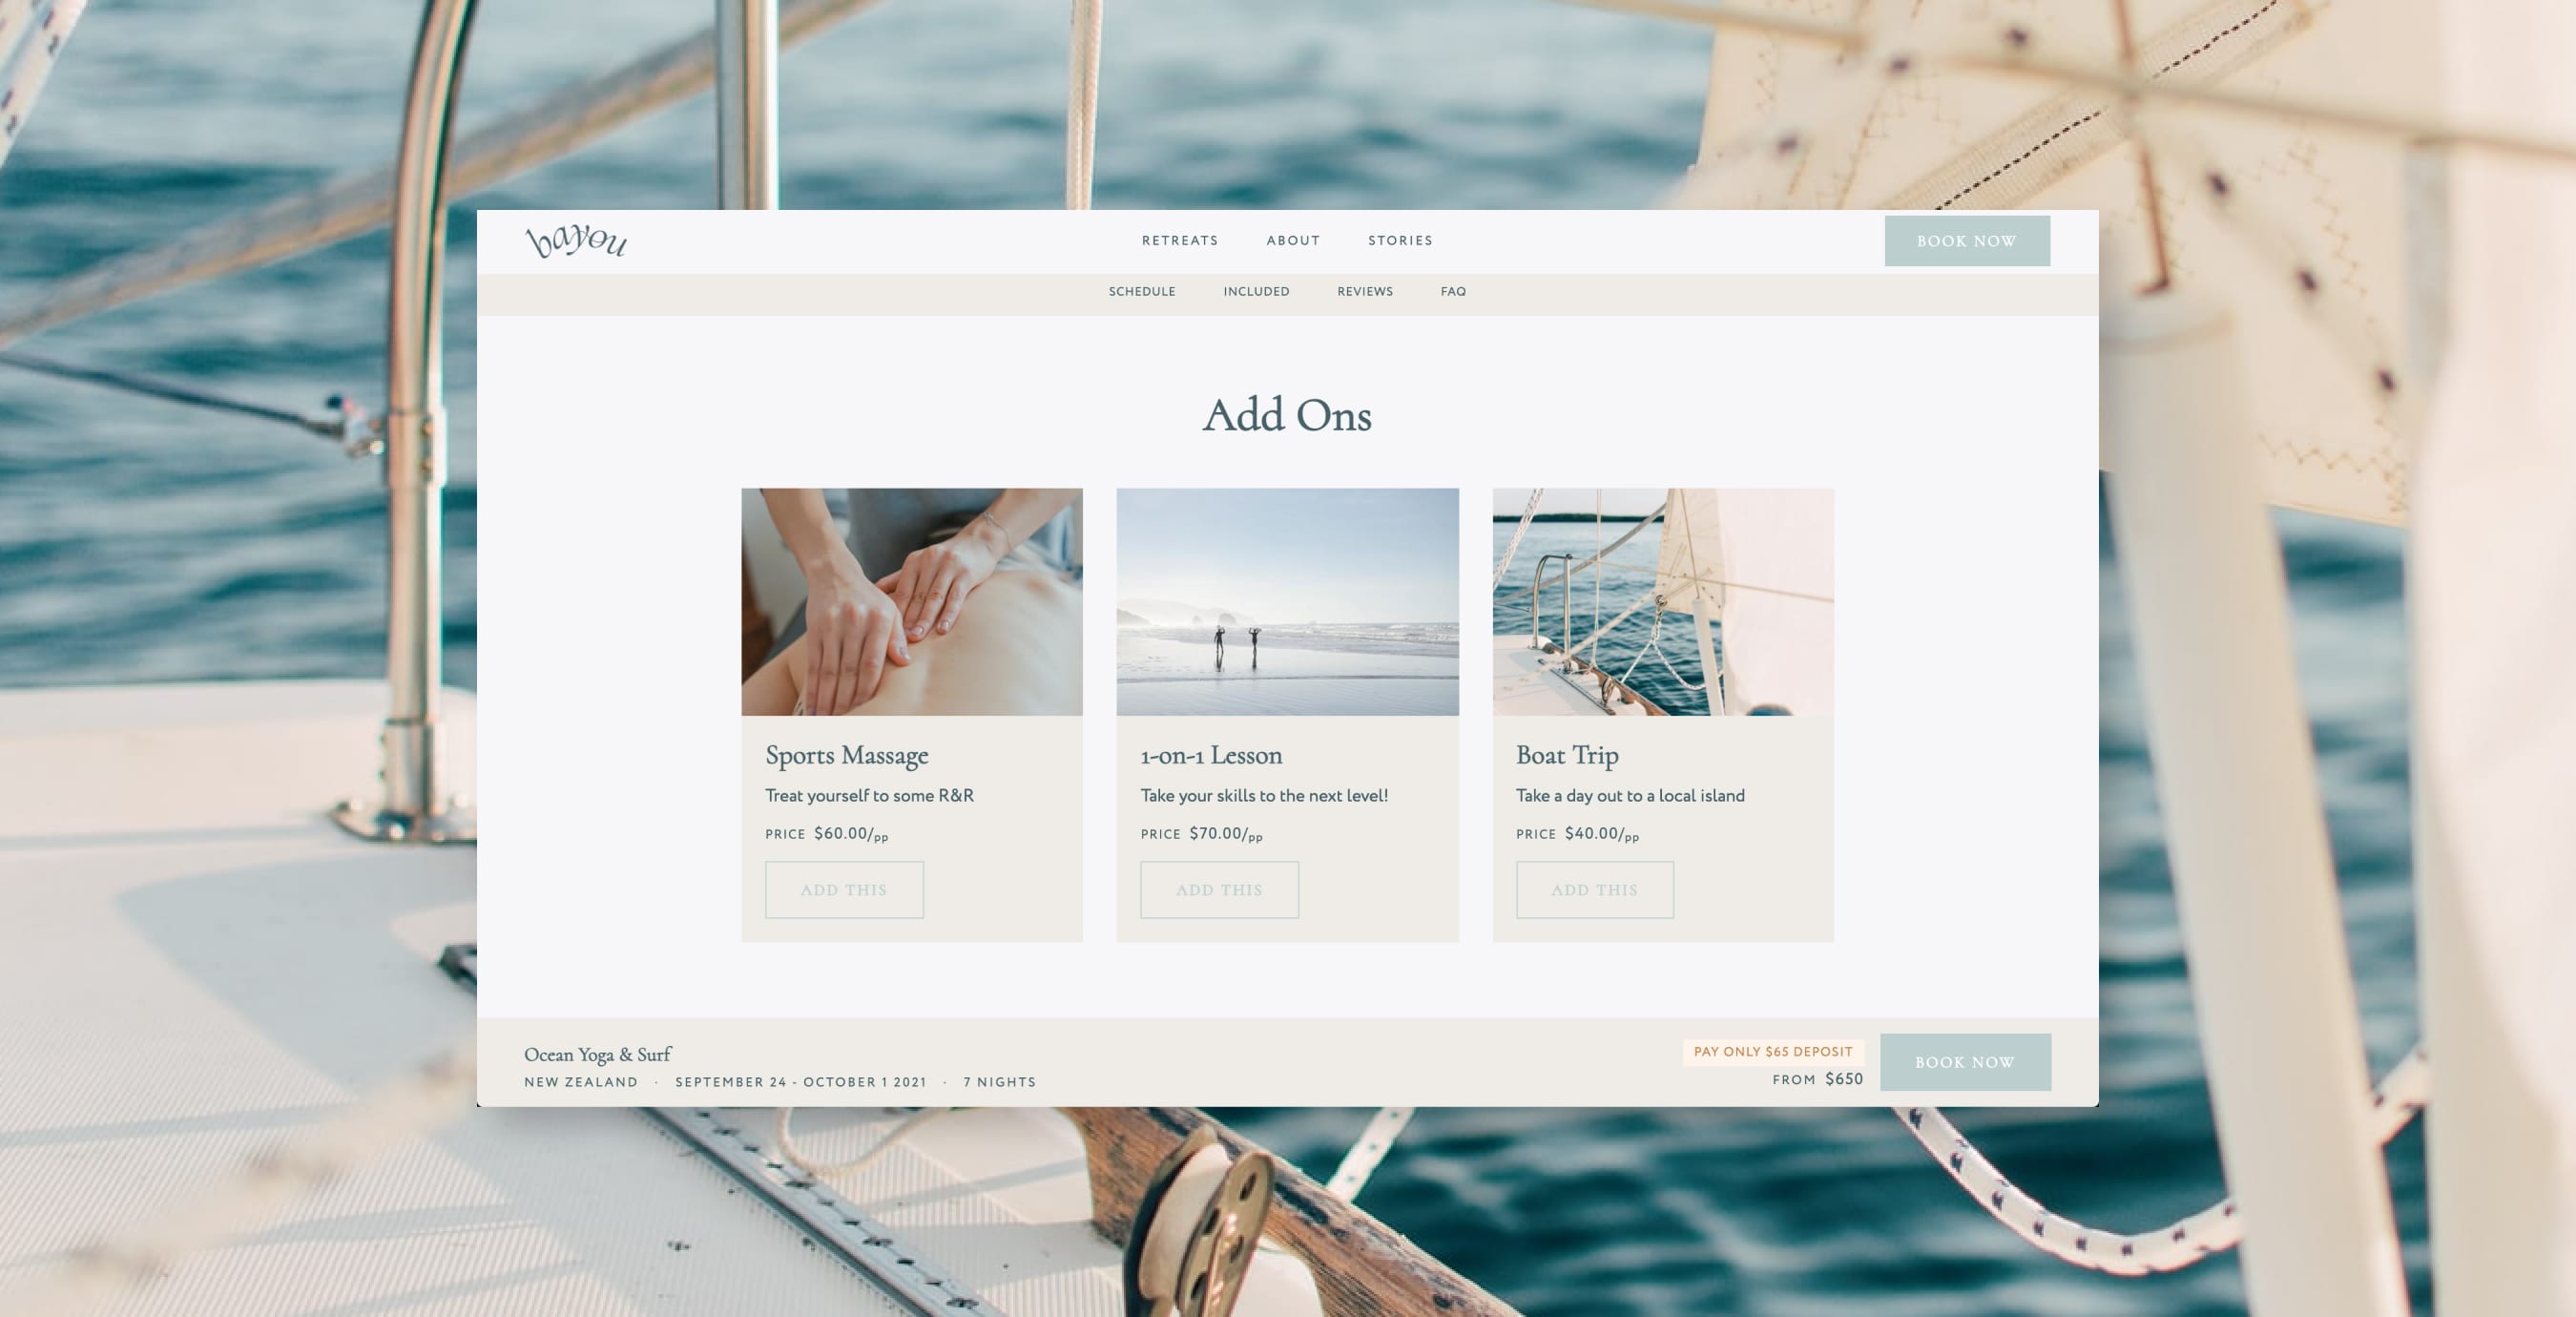
Add experience extras (optional)
Extras are a great way to let guests upgrade their experience and boost your average basket value. Managed under the Extras tab, they’re items that you sell on top of variants, like equipment hire, airport transfers, and add-on excursions.
Similar to experiences and accommodations, you can add details, including title, tagline, image, price, address, stock and more.
Configure payment settings (optional)
You can decide how customers make a booking. Under the Payment Settings tab, choose between:
Full payment at booking – By default, guests must pay the full price of the experience to secure their booking.
Deposit at booking – Customers can pay a percentage of the total price when they book. We’ll automatically send reminders to guests to pay the rest of the balance by a date you specify.
Payment plan – Customers can pay the total price in instalments and their credit card will be automatically charged equal payments on a monthly basis until the full balance is paid.
Enquiry-only booking – Customers book through an enquiry form.
3. Create the key pages for your site
Create other informative and inspiring pages that allow customers to familiarise themselves with your story, know what to expect, and learn why they should buy one of your experiences.
You can create these pages under My Site > Pages.
Set up your pages
You don’t need a complicated sitemap to have a high-performing site. Think about what kind of information your potential guests will have about your experiences and plan accordingly. It can be as simple as:
Home
Contact
About
FAQ
If you’re using a free Easol theme, you can add content to your pages by clicking Add Block and choosing from our library of content blocks – from hero videos and FAQs to testimonials and lineups. These blocks are commonly found on experience business sites and are optimised for conversions.
Aside from adding text, images, and videos, each content block comes with additional settings so you can customise its appearance, like background and text colours.
Learn how to customise your website themes with our step-by-step guide.
Update your header menu
Now that you’ve created your website pages, go to My Site > Menu to customise your header. To boost conversions, we recommend adding a main call to action button that links to a booking or checkout page.
4. Set up communications and marketing
You’re almost there! Now that your website and experiences are looking awesome, it’s time to seal the deal with streamlined communications and marketing.
Set up welcome emails
While guests will receive an automated booking confirmation email, you can also send a custom welcome email. Welcome emails are a perfect way to get your customers excited about the experience they’ve just booked, provide vital information and cover any common questions.
To set up a welcome email, select your experience or accommodation, go to the Settings tab and click on the Edit button next to Welcome email.
Create promotions and voucher codes
Promotions are discounts applied automatically at checkout, whereas voucher codes are specific codes manually entered by the guest at checkout. Both are solid tactics to boost online sales.
It’s easy to set up. Just go to Marketing and then select either Promotions or Voucher codes. You can set the discount amount (percentage or monetary amount), name, and expiry date.
Set up Google Analytics and Facebook Pixel
Analytics are key to business growth, which is why we’ve made it easy to integrate with your favourite marketing tools.
To set up Google Analytics and Facebook Pixel, go to Settings > Integrations and enter your tracking ID. Alternatively, you can input a Google Tag Manager container via My Site > Advanced and set up your tools on GTM.
5. Complete admin settings
Before you can start selling experiences, you’ll need to fill out some important information in your admin settings.
Add customer terms and conditions
On Easol, you own the whole customer journey – from your homepage to checkout and payment. That means you’ll need to upload your own terms and conditions and privacy policy for customers to agree to before booking.
To add your customer terms and conditions, go to Settings > Customer terms. You can adapt one of our free legal templates or create your own from scratch.
Add bank details to receive payments
To receive payments, you need to add your company’s payment and business information under Settings > Payments.
Make sure your bank account details are accurate before taking transactions to avoid any payment delays.
Switch on booking notifications
With Easol, you can get email notifications every time a customer makes a booking on your site. To switch on booking notifications, go to Settings > Notifications.
6. Check final technical details
There are a couple of small things to add before you launch. But don’t worry – these two are easy.
Optimise your site for search engines
SEO helps people to find your experience business. Make sure to fill in all your metadata, including meta title and meta description at My site > Advanced. We also recommend adding the metadata and social sharing image for your site pages (under the Meta tags tab) and experience pages (under the Marketing tab).
If you’re migrating to Easol from a platform like WordPress or Shopify, make sure to set up 301 redirects for any URLs that will be removed or changed. Check out our comprehensive SEO site migration guide for more information.
Review the launch checklist
Make a test booking and run through our launch checklist to ensure you haven’t missed any critical details.
7. Launch your website
It’s the moment you’ve been waiting for. The final step is to add your custom domain. While you don’t have to do it, custom domains help to establish your brand and build trust with customers.
Configure your custom domain
If you haven’t already, purchase a domain name from a DNS host like Cloudflare or GoDaddy. When you’ve bought your domain, go into your DNS settings, add the required CNAME records, and set up domain forwarding for your root domain (see step-by-step guide).
Once you’ve configured your domain go to My Site > Advanced in your dashboard.
Then add your root domain (with the www. prefix but without the https://) to the custom domain field.
Depending on your DNS provider, you may need to wait anywhere from a few minutes to a few hours for the site to go live.
Ready to get started?
With Easol, it’s easier and faster than ever to launch your experience business online. Book a demo with a member of our team to get started.
Nina Pang
Writer & Easol Pro Designer
Share Post